<?xml version="1.0" encoding="utf-8"?>
<feed xmlns="http://www.w3.org/2005/Atom">

  <title><![CDATA[Decodize]]></title>
  <link href="http://praveenvijayan.github.io/atom.xml" rel="self"/>
  <link href="http://praveenvijayan.github.io/"/>
  <updated>2015-01-10T10:48:27+05:30</updated>
  <id>http://praveenvijayan.github.io/</id>
  <author>
    <name><![CDATA[Praveen Vijayan]]></name>
    
  </author>
  <generator uri="http://octopress.org/">Octopress</generator>

  
  <entry>
    <title type="html"><![CDATA[Front-end Workflow Redefined - Modular Developemnt Using JADE, SCSS & Browserify]]></title>
    <link href="http://praveenvijayan.github.io/blog/2015/01/09/front-end-d-workflow-redefined-jade/"/>
    <updated>2015-01-09T23:22:33+05:30</updated>
    <id>http://praveenvijayan.github.io/blog/2015/01/09/front-end-d-workflow-redefined-jade</id>
    <content type="html"><![CDATA[<p>Happy new year!!</p>

<p>Front-end workflow redefined talk at Coffee @ DBG are up now.</p>

<p>Front-end development is complex as we have to deal with diversified project environments. Tooling will help to ease our workflow.</p>

<p>This presentation is about creating component based web development. Modular web development with JADE, SCSS and JS.</p>

<p><a href="https://speakerdeck.com/praveenvijayan/front-end-workflow-redefined">Front-end Workflow Redefined</a></p>

<script async class="speakerdeck-embed" data-id="f789669079880132ac40620a86ea453b" data-ratio="1.77777777777778" src="//speakerdeck.com/assets/embed.js"></script>

]]></content>
  </entry>
  
  <entry>
    <title type="html"><![CDATA[Tooling for Modern Web App Development]]></title>
    <link href="http://praveenvijayan.github.io/blog/2013/08/07/front-end-viewpoints-architecture-building-large-websites/"/>
    <updated>2013-08-07T00:18:00+05:30</updated>
    <id>http://praveenvijayan.github.io/blog/2013/08/07/front-end-viewpoints-architecture-building-large-websites</id>
    <content type="html"><![CDATA[<p>My slides from Coffee @ DBG are up now.</p>

<p>Front-end development workflow is becoming increasingly demanding as the complexity of the environment grows. Thankfully, there are many tools that can make your life as a front-end developer easier and perhaps, more rewarding.</p>

<p>The primary objective of this session is to get an idea about end-to-end front-end workflow and useful tools. We will discuss hot tools like Yeoman, Grunt and Bower. But the session is not limited to these tools - we will touch each phase of front-end development like boiler-plating, preprocessors, performance, documentation, code quality, reporting and architecture etc.</p>

<p><a href="https://speakerdeck.com/praveenvijayan/tooling-for-modern-web-app-developer">Tooling for modern web app development</a></p>

<script async class="speakerdeck-embed" data-id="e6585340e1aa0130a36c321b9e1f6449" data-ratio="1.33333333333333" src="//speakerdeck.com/assets/embed.js"></script>

]]></content>
  </entry>
  
  <entry>
    <title type="html"><![CDATA[Linktomob - Share Your Links Quickly and Easily on Mobile Devices.]]></title>
    <link href="http://praveenvijayan.github.io/blog/2013/03/10/linktomob-share-your-links-quickly-and-easily-on-mobile-devices/"/>
    <updated>2013-03-10T20:08:00+05:30</updated>
    <id>http://praveenvijayan.github.io/blog/2013/03/10/linktomob-share-your-links-quickly-and-easily-on-mobile-devices</id>
    <content type="html"><![CDATA[<h2>Introduction</h2>

<p><img src="http://lh6.googleusercontent.com/-3IhQtLdpY7g/UTy5XwzCNpI/AAAAAAAAFQE/srBx0ten90Q/s816/Linktomob%2520%2520%2520%2520Share%2520your%2520link%2520quickly.png" alt="Linktomob">
Linktomob created with an aim to share link between multiple devices without any hassles. Switching links between mobile and desktop browsers is a difficult process. We face this issue when building responsive site, mobile apps/sites or like to view site on mobile device when you are on a desktop. In such situations we will mail link and open it on mobile device. But if we want to test that link on a friends device or on a public testing device, in such situation sharing the same link on magnitude of devices will be a Herculean task.</p>

<!-- more -->


<h2>How to use it?</h2>

<p><img src="http://lh4.googleusercontent.com/-h0rnTDH0yTc/UTy0rmzpXnI/AAAAAAAAFP8/WMDtqclA6g8/s720/linktomob.jpg" alt="linktomob"></p>

<ol>
<li>Go to <a href="http://linktomob.appspot.com/"><a href="http://linktomob.appspot.com/">http://linktomob.appspot.com/</a></a>.</li>
<li>Enter your mail id and activate your account.</li>
<li>You will get a unique URL (<a href="http://linktomob.appspot.com/">http://linktomob.appspot.com/</a>{id}) and a bookmarklet.</li>
<li>Drag n Drop bookmarklet into browser.</li>
<li>Go to any link and click on linktomob bookmarklet.</li>
<li>This will map the current url with your unique URL. You can access the site from any device using the link.</li>
</ol>


<h2>Features</h2>

<ol>
<li>No login.</li>
<li>No browser plugin or add-on installation. Browser bookmarklet for all browsers.</li>
<li>No app installation on mobile device.</li>
<li>Platform independent - works on iOS, Blackberry, Windows phone, Android, Nokia etc..</li>
<li>You have to remember only your linkmark url.</li>
</ol>


<h2>Linktomob URL structure</h2>

<p><strong><em>URL</em></strong> <br>
<a href="http://linktomob.appspot.com/">http://linktomob.appspot.com/</a>{id} <br>
Eg: <a href="http://linktomob.appspot.com/1">http://linktomob.appspot.com/1</a></p>

<p><strong><em>list linkmarked urls</em></strong> <br>
<a href="http://linktomob.appspot.com/">http://linktomob.appspot.com/</a>{id}:{pageno} <br>
Eg: <a href="http://linktomob.appspot.com/1:10">http://linktomob.appspot.com/1:10</a></p>

<p><strong><em>regenerate bookmark</em></strong> <br>
<a href="http://linktomob.appspot.com/">http://linktomob.appspot.com/</a>{id}/bookmark <br>
Eg: <a href="http://linktomob.appspot.com/1/bookmark">http://linktomob.appspot.com/1/bookmark</a></p>
]]></content>
  </entry>
  
  <entry>
    <title type="html"><![CDATA[Getting Started With Yeoman 1.0 Beta on Windows]]></title>
    <link href="http://praveenvijayan.github.io/blog/2013/03/03/getting-started-with-yeoman-1-dot-0-beta-on-windows/"/>
    <updated>2013-03-03T01:23:00+05:30</updated>
    <id>http://praveenvijayan.github.io/blog/2013/03/03/getting-started-with-yeoman-1-dot-0-beta-on-windows</id>
    <content type="html"><![CDATA[<h3>Update</h3>

<p><strong><em>April 8th 2013</em></strong></p>

<p><strong><em>Yomen normal installation (npm install) works fine now. No need to do extra steps for windows.</em></strong></p>

<ol>
<li><code>install -g yo grunt-cli bower</code></li>
<li><code>yo webapp</code></li>
<li><code>npm install &amp;&amp; bower install</code></li>
<li><code>grunt</code></li>
</ol>


<h2>Introduction.</h2>

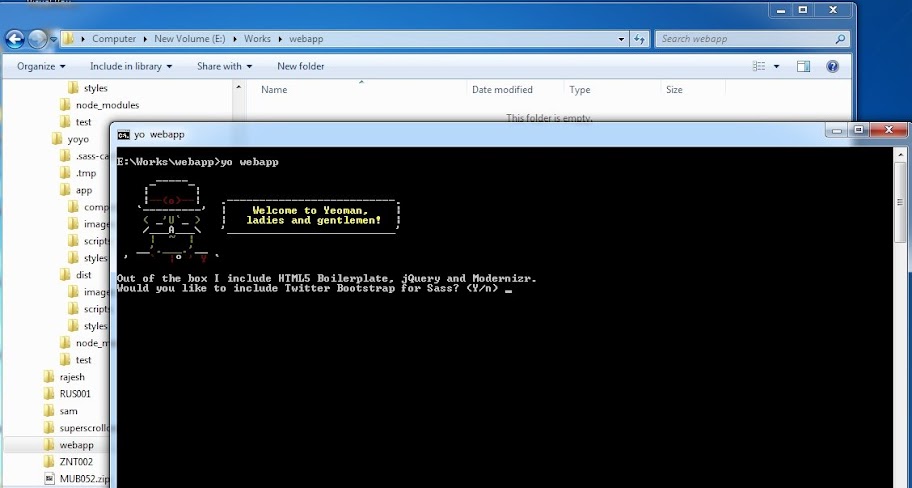
<p>Yeoman 1.0 Beta out a few days ago. Its not officially supported on Windows, as of now we have to do some extra work to make it work on windows. Installing this version is simpler than previous <a href="http://decodize.com/css/installing-yeoman-front-end-development-stack-windows/">Yeoman 0.9 on windows</a>.</p>

<p><img src="//lh6.googleusercontent.com/-ABbM-YmiiwQ/UTJtmXMqdXI/AAAAAAAAFOo/aCThSsOZ8h0/s912/init.jpg" alt="Yeoman 1.0 Beta" /></p>

<p>Don&rsquo;t use Yeoman 1.0 Beta in production, it may have bugs.</p>

<p>In new version tools are divided into 3 category.</p>

<p><img src="//raw.github.com/yeoman/yeoman.io/gh-pages/media/workflow.jpg" alt="Yeoman yo, bower and grunt" /></p>

<!-- more -->


<p><strong><em><a href="http://yeoman.io">yo</a></em></strong> for scaffolding tools. <br>
<strong><em><a href="http://gruntjs.com">grunt 0.4.0</a></em></strong> as build tool. <br>
<strong><em><a href="http://twitter.github.com/bower/">bower</a></em></strong> as package management tool.</p>

<p>Bower and Grunt 0.4.0 will work on windows. I faced problem when installing Mocha and Imagemin.</p>

<h2>Installation</h2>

<ol>
<li>Install <a href="http://nodejs.org">nodejs</a> if its not installed.</li>
<li>Uninstall previously installed gruntjs.</li>
<li>Install yo, grunt-cli and bower using:- <code>install -g yo grunt-cli bower</code></li>
</ol>


<p>Note: You must install Compass if planned to use SASS/SCSS.</p>

<p>Create a project folder and open it in cmd.</p>

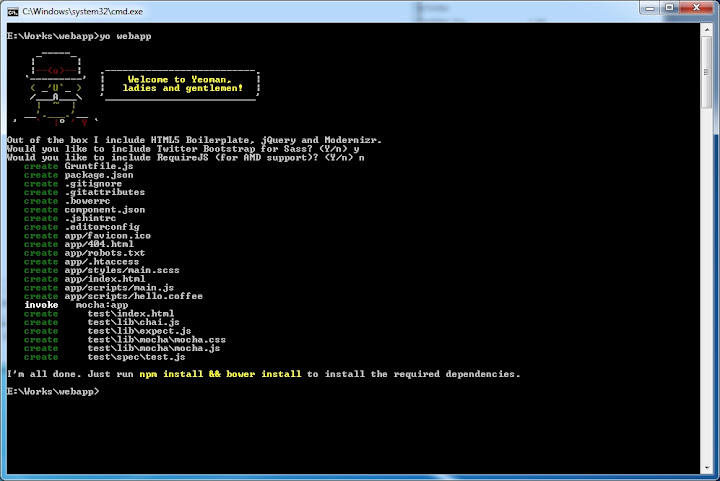
<p>type: <code>yo webapp</code></p>

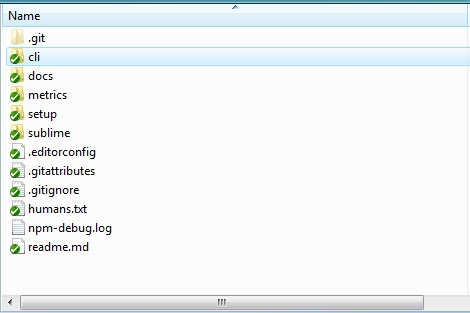
<p><img src="//lh5.googleusercontent.com/-CUD_PZfAZ0E/UTJtgqnQclI/AAAAAAAAFNs/AG_hbjFzMWg/s720/files.jpg" alt="Yeoman webapp" /></p>

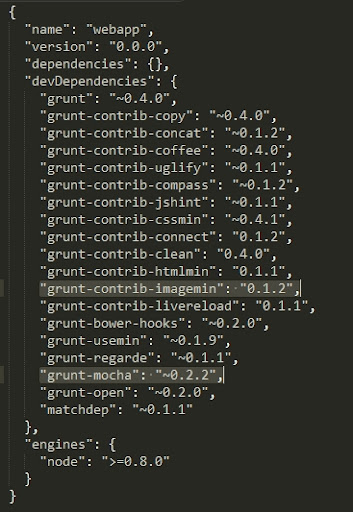
<p>It will ask you some questions about the type of the project. Once project created, open package.json and delete</p>

<pre><code>"grunt-contrib-imagemin":"0.1.2"
"grunt-mocha":"~0.2.2"
</code></pre>

<p><img src="//lh4.googleusercontent.com/-gE15X7PGCyg/UTJtlJutHfI/AAAAAAAAFOU/dnYptoDRM-U/s512/package-json.jpg" alt="Grunt package.json" /></p>

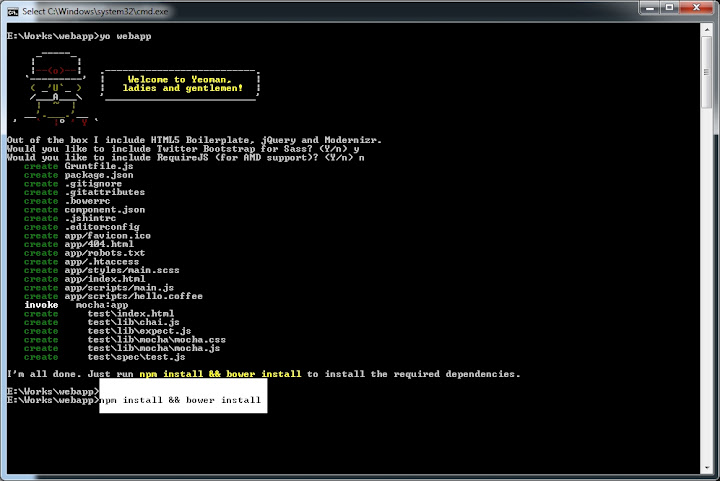
<p>Save it and run</p>

<p><code>npm install &amp;&amp; bower install</code></p>

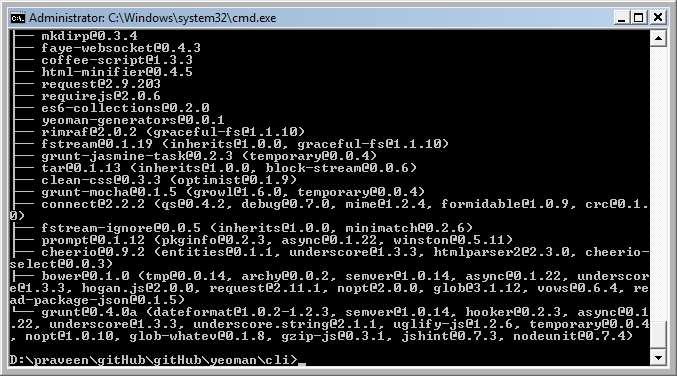
<p><img src="//lh6.googleusercontent.com/-Ms1FbZpVr3I/UTJtj2-wK9I/AAAAAAAAFOM/mBN-XHQIy_8/s720/npm-install-and-bower.jpg" alt="npm install &amp;&amp; bower install" /></p>

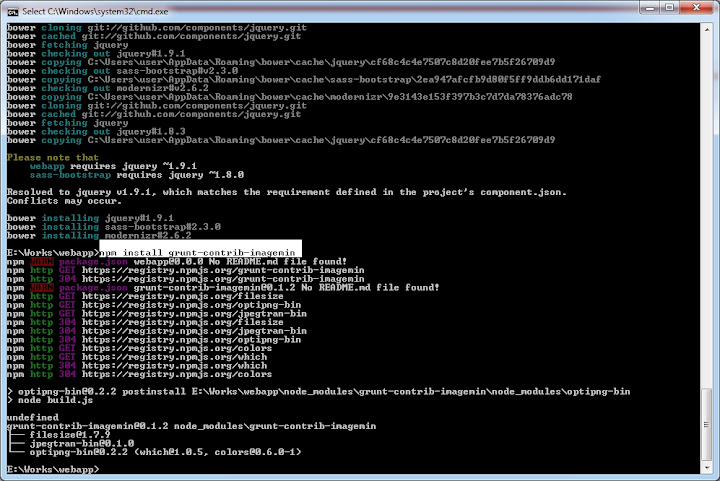
<p>Sit and relax, it will install all project dependencies. Run following command once installation completes.</p>

<pre><code>npm install grunt-contrib-imagemin
</code></pre>

<p><img src="//lh5.googleusercontent.com/-bTw6y61G08Y/UTJthdzVB2I/AAAAAAAAFN8/i-VL1BWdNUk/s720/imagemin.jpg" alt="imagemin" /></p>

<p>It installs optipng and jpegtran. After installation open package.json and add <code>&ldquo;grunt-contrib-imagemin&rdquo;:&ldquo;0.1.2&rdquo;</code> in the list.</p>

<p>Now comes the hardest part : Mocha test suite installation.</p>

<p>Go to <a href="http://phantomjs.org/">phantomjs.org </a> and <a href="http://phantomjs.org/download.html">download phantomjs for windows</a> and extract it in a folder named &lsquo;phantom&rsquo;. Its important to name it as phantom.</p>

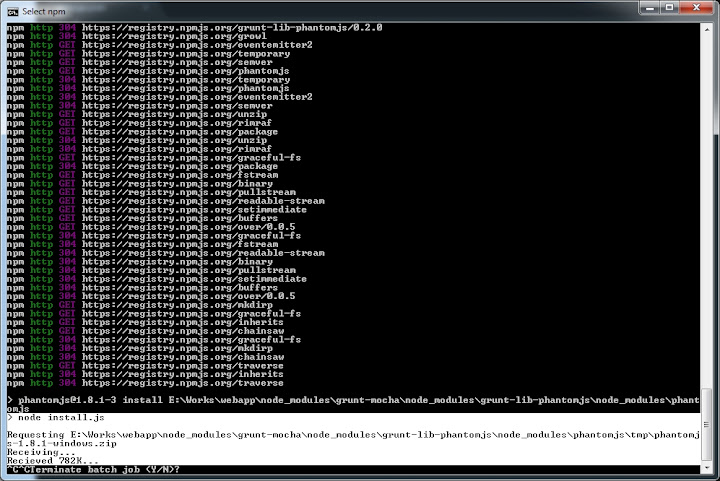
<p>Run <code>npm install grunt-mocha</code></p>

<p>Count on the messages and stop execution by pressing ctrl+c when you saw &ldquo;Requesting&hellip;&rdquo; (Terminate the batch job).</p>

<p><img src="//lh3.googleusercontent.com/-8IY6Yw_6SxI/UTJtnIDs88I/AAAAAAAAFOk/_eS8LsePVrY/s720/phantom.jpg" alt="Phantomjs" /></p>

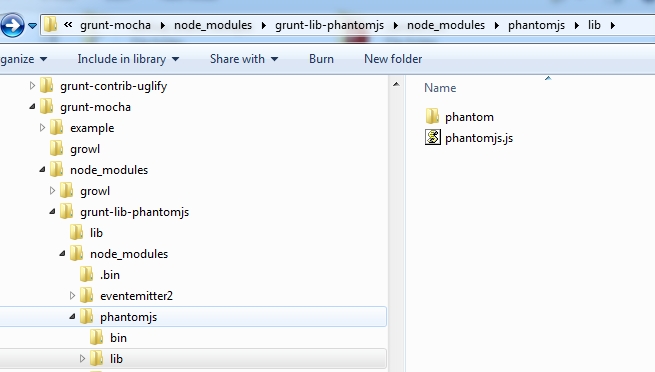
<p>Open the following location,
<code>node_modules/grunt-mocha/node-modules/grunt-lib-phantomjs/node_modules/phantomjs/lib/</code>
copy and paste phantom folder (extracted files from phantomjs.org) here.</p>

<p><img src="//lh6.googleusercontent.com/-kMjUR0MXWhk/UTJti3I4kJI/AAAAAAAAFOE/CQDn9akBaPo/s655/lib.jpg" alt="phantom location" /></p>

<p>Open  package.json from project root folder and add <code>&ldquo;grunt-mocha&rdquo;:&ldquo;~0.2.2&rdquo;</code> back to the list. Close cmd and reopen it. Now everything in place and we can play with yeoman commands.</p>

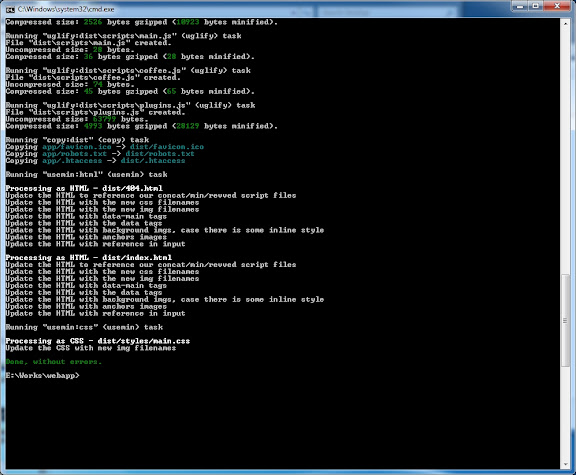
<p>run <code>grunt</code></p>

<p>This will generate production quality version of your app in dist folder.</p>

<p><img src="//lh3.googleusercontent.com/-UcV7VaD3fYo/UTJtgzrVrMI/AAAAAAAAFN0/nWk_TDQpJVw/s576/build.jpg" alt="Yeoman build version" /></p>

<h2>Yo commands</h2>

<pre><code>yo webapp - creates project structure
grunt test - test against Mocha test suite
grunt server - runs your app in local server
grunt watch - watch modified fles and recompile it. 
</code></pre>

<p>More on <a href="//yeoman.io/gettingstarted_1.0.html">Yeoman 1.0 beta</a>
        <a href="//github.com/yeoman/yeoman/wiki">Yeoman github documentation</a></p>

<h2>Errors may encounter during installation</h2>

<p>Some of the following issues may encounter during the installation.</p>

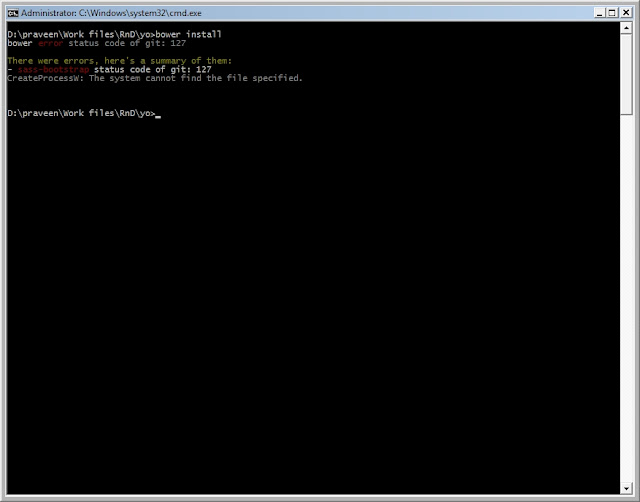
<h4>Bower error status code of git :127</h4>

<p>I got error 128 when I tried powershell.</p>

<p><img src="//lh6.googleusercontent.com/-da-gBAq5pMU/UTNPTVyFnBI/AAAAAAAAFO4/UhNm4e4qcH0/s640/yo-bower.jpg" alt="Git environment variable" /></p>

<p>Solution: add Git path in windows environment variables.</p>

<p><a href="//lh5.googleusercontent.com/-cpgqYXV60Hc/UTNPYeH0w1I/AAAAAAAAFPA/R1cTl9pkoUg/s2000/setEnvironment-variable.jpg"><img src="//lh5.googleusercontent.com/-cpgqYXV60Hc/UTNPYeH0w1I/AAAAAAAAFPA/R1cTl9pkoUg/s576/setEnvironment-variable.jpg" alt="Git environment variable solution" /></a></p>

<h4>Error listen EADDRINUSE &hellip;.</h4>

<p>Sometimes when you use <code>grunt server</code>, may encounter this error. This is because of the port is being used by another program. Find the program which uses the port.</p>

<p><code>netstat -aon | grep 35729</code> to filter the port and PID. Open task manager and kill the process. Run grunt server again.</p>

<p><a href="//lh6.googleusercontent.com/-skPfc85wpMI/UTNUZrwsLEI/AAAAAAAAFPY/DakhPLwG-EU/s2000/pid-taskmanager.jpg"><img src="//lh6.googleusercontent.com/-skPfc85wpMI/UTNUZrwsLEI/AAAAAAAAFPY/DakhPLwG-EU/s1024/pid-taskmanager.jpg" alt="EADDRINUSE" /></a></p>

<h2>Summary</h2>

<p>Yeoman 1.0 Beta is simpler than previous version. There are differences in the way command supplies, previously to boot up local server we used &lsquo;yeoman server&rsquo;, but now it is &lsquo;grunt server&rsquo;. Yeoman, grunt and bower are separated in this version and it is more flexible than previous Yeoman 0.9.</p>
]]></content>
  </entry>
  
  <entry>
    <title type="html"><![CDATA[Slidemote - Universal Remote Control for Html5 Presentations]]></title>
    <link href="http://praveenvijayan.github.io/blog/2013/02/09/slidemote-universal-remote-control-for-html5-presentations/"/>
    <updated>2013-02-09T02:04:00+05:30</updated>
    <id>http://praveenvijayan.github.io/blog/2013/02/09/slidemote-universal-remote-control-for-html5-presentations</id>
    <content type="html"><![CDATA[<h2>Introduction</h2>

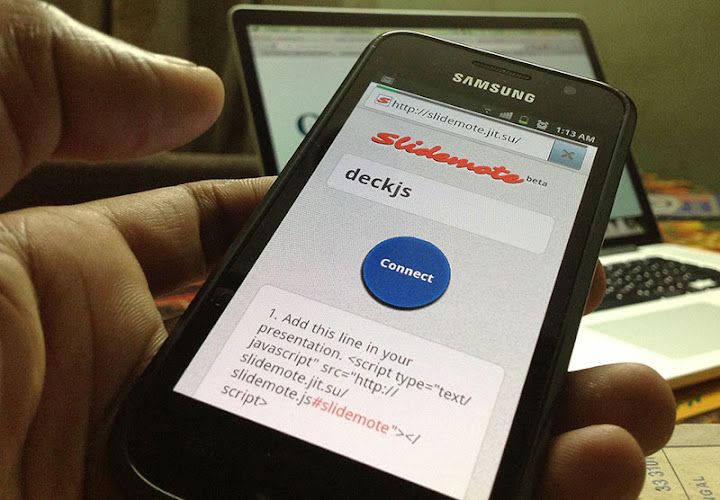
<p><a href="http://slidemote.jit.su/">Slidemote</a> is a web app created for easy integration of remote control facility for html5 presentations.</p>

<p><img src="http://lh3.googleusercontent.com/-WyqIyccQK7c/URVkeV4sTwI/AAAAAAAAFKA/xlbs8XU4eNk/s720/slidemote.jpg" alt="Slidemote" /></p>

<!-- More -->


<h2>Integration</h2>

<ol>
<li>Add following script in your presentation.
<code>&lt;script type="text/javascript" src="http://slidemote.jit.su/slidemote.js#slidemote"&gt;&lt;/script&gt;</code></li>
<li>Append your id at the end of the script (Eg: &hellip;slidemote.js#YOUR_ID ).</li>
<li>Goto - <a href="http://slidemote.jit.su">Slidemote</a>.</li>
<li>Enter YOUR_ID &amp; connect.</li>
<li>Slidemote currently supports (basic level) - <a href="http://lab.hakim.se/reveal-js/">revealjs</a>, <a href="http://bartaz.github.com/impress.js/#/bored">impressjs</a>, <a href="http://imakewebthings.com/deck.js/">deckjs</a> and <a href="http://flowtime-js.marcolago.com/">flowtime</a>.</li>
</ol>


<h2>How it works?</h2>

<p>Slidemote uses <a href="http://socket.io/">socketio</a> to leverage websocket communication. Slidemote is hosted at <a href="http://jit.su/">Nodejitsu</a>, a nodejs hosting service.</p>

<p><code><a href="http://slidemote.jit.su/slidemote.js#id">http://slidemote.jit.su/slidemote.js#id</a></code>  will communicate to server with your ID. Provide same id at &ldquo;<a href="http://slidemote.jit.su">http://slidemote.jit.su</a>&rdquo;, it will establish a websocket connection.</p>

<h2>Demo</h2>

<p>Go to <a href="http://slidemote.jit.su">Slidemote</a> and enter following key and press connect. Once connected you are able to control this presentation. It will take a few seconds to connect, be patient. Don&rsquo;t refresh page, result will be a new key and you have to enter it again on &lsquo;slidemote.jit.su&rsquo; to establish connection.</p>

<p>Key: <input type="text" id="slidemoteCode" class="txtSlidemoteCode" placeholder="Your key"></p>

<iframe id="iframeRevealjs" src="http://demos.decodize.com/slidemote/revealjs/index.php" frameborder="0" width="100%" height="600"></iframe>


<h4>&nbsp;</h4>

<h3>Other demos</h3>

<p><span class="demoBtn"> <a href="http://demos.decodize.com/slidemote/flowtime/" target="_blank">Flowtime</a> <a href="http://demos.decodize.com/slidemote/impress/" target="_blank">Impress</a><a href="http://demos.decodize.com/slidemote/deckjs/" target="_blank">Deckjs</a></span></p>

<h2>Screenshots</h2>

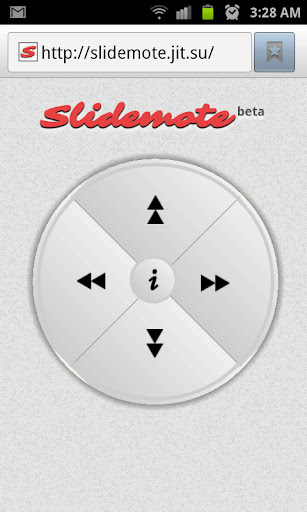
<p><strong><em>Revealjs controls</em></strong><br>
<img src="https://lh6.googleusercontent.com/-S0xne3Q_Q1M/URV4IL9AwXI/AAAAAAAAFKs/5SgrDTZ04qg/s512/slidemote-revealjs.jpg" alt="Revealjs" /><br>
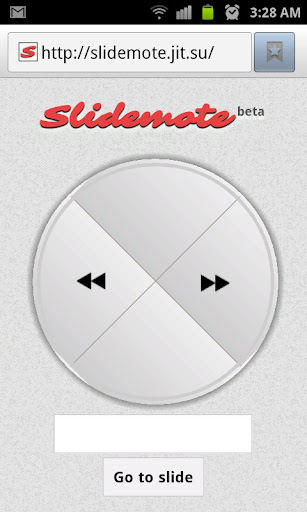
<strong><em>Deckjs &amp; Impressjs controls</em></strong><br>
<img src="https://lh4.googleusercontent.com/-QHEzN0zQhag/URV4HBI6b0I/AAAAAAAAFKc/wP8-a0Kgulk/s512/slidemote-deckjs.jpg" alt="Revealjs" />
<br>
<strong><em>Flowtime controls</em></strong><br>
<img src="https://lh5.googleusercontent.com/-0oK11Krj8XQ/URV4HPWHfKI/AAAAAAAAFKo/emPooYJ733Q/s512/slidemote-flowtime.jpg" alt="Revealjs" /></p>

<h2>Video</h2>

<iframe width="560" height="315" src="http://www.youtube.com/embed/XSHjlieYgjg" frameborder="0" allowfullscreen></iframe>


]]></content>
  </entry>
  
  <entry>
    <title type="html"><![CDATA[Simple Responsive Image Technique]]></title>
    <link href="http://praveenvijayan.github.io/blog/2013/01/04/simple-responsive-image-technique/"/>
    <updated>2013-01-04T00:19:00+05:30</updated>
    <id>http://praveenvijayan.github.io/blog/2013/01/04/simple-responsive-image-technique</id>
    <content type="html"><![CDATA[<p>RWD (Responsive Web Design) is increasingly popular over past few years. One important problem faced by RWD is lack of a standardised solution to deliver resized images into multiple devices. We have wide range of device categories, screen resolutions, pixel densities and lack of bandwidth/connection detection methods, all made this process difficult.  There is no simple silver bullet  to solve this issue.</p>

<p>This is a quick post on a simple technique I used to create responsive image. This is a javascript solution, but it will work in javascript disabled environment by using a noscript fallback. This technique will start with mobile image first &amp; there is no need to parse and replace image sources.</p>

<!-- more -->


<p>I’m using google picasa as my image host. I can resize images dynamically by setting width/height in the url.</p>

<p><a href="http://demos.decodize.com/responsive-images/demo.html" title="Responsive images&quot; target=&quot;_blank">Responsive images demo</a></p>

<p>Eg:
//lh3.googleusercontent.com/-Rw0hpxt70co/ULeX80ncW3I/AAAAAAAAE6g/kIDj6u1zdyI/<strong>s640</strong>/query-loader1.jpg</p>

<p>Setting <strong>s320</strong> will create image with width/Height (resize proportionally) 320px. We can also pass width or height. Setting <strong>w320</strong> will create an image with width 320px or passing <strong>h320</strong> will constrain height of dynamically created image to 320px. Now we have our server, which can provide us different images sizes upon request.</p>

<p>You can use your own server methods or other resources like <a href="http://www.sencha.com/learn/how-to-use-src-sencha-io/">src.sencha.io</a> to resize images on the fly.</p>

<h3>Technique</h3>

<p>Using css fluid image technique scale image to viewpot. Get the device size and insert image using script.</p>

<p><strong><em>CSS</em></strong></p>

<figure class='code'><figcaption><span></span></figcaption><div class="highlight"><table><tr><td class="gutter"><pre class="line-numbers"><span class='line-number'>1</span>
<span class='line-number'>2</span>
<span class='line-number'>3</span>
<span class='line-number'>4</span>
<span class='line-number'>5</span>
</pre></td><td class='code'><pre><code class='css'><span class='line'><span class="nt">img</span> <span class="p">{</span>
</span><span class='line'>  <span class="k">display</span><span class="o">:</span> <span class="k">block</span><span class="p">;</span>
</span><span class='line'>  <span class="k">border</span><span class="o">:</span> <span class="m">0</span><span class="p">;</span>
</span><span class='line'>  <span class="k">max-width</span><span class="o">:</span> <span class="m">100%</span><span class="p">;</span>
</span><span class='line'><span class="p">}</span>
</span></code></pre></td></tr></table></div></figure>


<p><strong><em>JavaScript</em></strong> <br></p>

<figure class='code'><figcaption><span></span></figcaption><div class="highlight"><table><tr><td class="gutter"><pre class="line-numbers"><span class='line-number'>1</span>
<span class='line-number'>2</span>
<span class='line-number'>3</span>
<span class='line-number'>4</span>
<span class='line-number'>5</span>
<span class='line-number'>6</span>
<span class='line-number'>7</span>
<span class='line-number'>8</span>
<span class='line-number'>9</span>
<span class='line-number'>10</span>
<span class='line-number'>11</span>
<span class='line-number'>12</span>
<span class='line-number'>13</span>
<span class='line-number'>14</span>
<span class='line-number'>15</span>
<span class='line-number'>16</span>
<span class='line-number'>17</span>
<span class='line-number'>18</span>
<span class='line-number'>19</span>
<span class='line-number'>20</span>
<span class='line-number'>21</span>
<span class='line-number'>22</span>
<span class='line-number'>23</span>
<span class='line-number'>24</span>
<span class='line-number'>25</span>
<span class='line-number'>26</span>
<span class='line-number'>27</span>
<span class='line-number'>28</span>
<span class='line-number'>29</span>
<span class='line-number'>30</span>
<span class='line-number'>31</span>
<span class='line-number'>32</span>
<span class='line-number'>33</span>
<span class='line-number'>34</span>
<span class='line-number'>35</span>
<span class='line-number'>36</span>
<span class='line-number'>37</span>
<span class='line-number'>38</span>
<span class='line-number'>39</span>
<span class='line-number'>40</span>
<span class='line-number'>41</span>
<span class='line-number'>42</span>
<span class='line-number'>43</span>
</pre></td><td class='code'><pre><code class='javascript'><span class='line'><span class="o">&lt;</span><span class="nx">script</span><span class="o">&gt;</span>
</span><span class='line'>    <span class="kd">var</span> <span class="nx">cwResImg</span> <span class="o">=</span> <span class="kd">function</span> <span class="p">()</span> <span class="p">{</span>
</span><span class='line'>  <span class="kd">var</span> <span class="nx">cwBpArry</span> <span class="o">=</span> <span class="p">[</span><span class="mi">1382</span><span class="p">,</span> <span class="mi">992</span><span class="p">,</span> <span class="mi">768</span><span class="p">,</span> <span class="mi">480</span><span class="p">],</span> <span class="c1">//Image breakpoint arrays</span>
</span><span class='line'>      <span class="nx">currIndex</span><span class="p">,</span>
</span><span class='line'>      <span class="nx">cwResImgVal</span> <span class="o">=</span> <span class="nb">Math</span><span class="p">.</span><span class="nx">max</span><span class="p">(</span><span class="nx">screen</span><span class="p">.</span><span class="nx">width</span><span class="p">,</span><span class="nx">screen</span><span class="p">.</span><span class="nx">height</span><span class="p">),</span>
</span><span class='line'>      <span class="nx">hdpi</span> <span class="o">=</span> <span class="nb">window</span><span class="p">.</span><span class="nx">devicePixelRatio</span> <span class="o">&gt;</span> <span class="mi">1</span> <span class="o">?</span> <span class="nb">window</span><span class="p">.</span><span class="nx">devicePixelRatio</span> <span class="o">:</span> <span class="mi">1</span><span class="p">,</span>
</span><span class='line'>      <span class="nx">rwdImgId</span> <span class="o">=</span> <span class="s2">&quot;rwdimg-&quot;</span><span class="o">+</span><span class="nb">Math</span><span class="p">.</span><span class="nx">floor</span><span class="p">(</span><span class="nb">Math</span><span class="p">.</span><span class="nx">random</span><span class="p">()</span><span class="o">*</span><span class="mi">1000</span><span class="p">),</span>
</span><span class='line'>      <span class="nx">tpl</span><span class="o">=</span><span class="s1">&#39;&lt;img src=&quot;{src}&quot; alt=&quot;{alt}&quot; title=&quot;{title}&quot; id=&quot;{rwdImgId}&quot; {attributes}&gt;&#39;</span><span class="p">;</span>
</span><span class='line'>
</span><span class='line'>  <span class="nx">cwBpArry</span><span class="p">.</span><span class="nx">push</span><span class="p">(</span><span class="nx">cwResImgVal</span><span class="p">);</span>
</span><span class='line'>  <span class="nx">cwBpArry</span><span class="p">.</span><span class="nx">sort</span><span class="p">(</span><span class="kd">function</span><span class="p">(</span><span class="nx">a</span><span class="p">,</span><span class="nx">b</span><span class="p">){</span><span class="k">return</span> <span class="nx">a</span><span class="o">-</span><span class="nx">b</span><span class="p">});</span>
</span><span class='line'>
</span><span class='line'>  <span class="k">if</span><span class="p">(</span><span class="nb">Array</span><span class="p">.</span><span class="nx">prototype</span><span class="p">.</span><span class="nx">indexOf</span><span class="p">){</span>
</span><span class='line'>      <span class="nx">currIndex</span> <span class="o">=</span> <span class="nx">cwBpArry</span><span class="p">.</span><span class="nx">indexOf</span><span class="p">(</span><span class="nx">cwResImgVal</span><span class="p">)</span> <span class="o">+</span> <span class="mi">1</span><span class="p">;</span>
</span><span class='line'>  <span class="p">}</span><span class="k">else</span><span class="p">{</span>
</span><span class='line'>      <span class="k">for</span><span class="p">(</span><span class="kd">var</span> <span class="nx">i</span> <span class="k">in</span> <span class="nx">cwBpArry</span><span class="p">){</span>
</span><span class='line'>          <span class="k">if</span><span class="p">(</span><span class="nx">cwBpArry</span><span class="p">[</span><span class="nx">i</span><span class="p">]</span> <span class="o">===</span> <span class="nx">cwResImgVal</span><span class="p">){</span>
</span><span class='line'>              <span class="nx">currIndex</span> <span class="o">=</span> <span class="nb">parseInt</span><span class="p">(</span><span class="nx">i</span><span class="p">)</span><span class="o">+</span><span class="mi">1</span><span class="p">;</span>
</span><span class='line'>          <span class="p">}</span>
</span><span class='line'>      <span class="p">}</span>        
</span><span class='line'>  <span class="p">}</span>
</span><span class='line'>
</span><span class='line'>  <span class="nx">cwBpArry</span><span class="p">[</span><span class="nx">currIndex</span><span class="p">]</span> <span class="o">=</span> <span class="nx">cwBpArry</span><span class="p">[</span><span class="nx">currIndex</span><span class="p">]</span> <span class="o">||</span> <span class="nx">cwBpArry</span><span class="p">[</span><span class="nx">currIndex</span><span class="o">-</span><span class="mi">1</span><span class="p">];</span>
</span><span class='line'>
</span><span class='line'>  <span class="kd">var</span> <span class="nx">imgWid</span> <span class="o">=</span> <span class="nb">Math</span><span class="p">.</span><span class="nx">max</span><span class="p">.</span><span class="nx">apply</span><span class="p">(</span><span class="nb">Math</span><span class="p">,</span> <span class="nx">cwBpArry</span><span class="p">)</span> <span class="o">&lt;=</span> <span class="nx">cwBpArry</span><span class="p">[</span><span class="nx">currIndex</span><span class="p">]</span> <span class="o">?</span> <span class="nx">cwBpArry</span><span class="p">[</span><span class="nx">currIndex</span><span class="o">-</span><span class="mi">2</span><span class="p">]</span> <span class="o">:</span> <span class="nx">cwBpArry</span><span class="p">[</span><span class="nx">currIndex</span><span class="p">];</span>
</span><span class='line'>
</span><span class='line'>  <span class="k">return</span> <span class="p">{</span>
</span><span class='line'>      <span class="nx">imgWid</span> <span class="o">:</span> <span class="nx">imgWid</span><span class="p">,</span>
</span><span class='line'>      <span class="nx">hdpi</span><span class="o">:</span> <span class="nx">hdpi</span><span class="p">,</span>
</span><span class='line'>      <span class="nx">id</span><span class="o">:</span><span class="nx">rwdImgId</span><span class="p">,</span>
</span><span class='line'>      <span class="nx">rwdImg</span><span class="o">:</span><span class="kd">function</span><span class="p">(</span><span class="nx">arg</span><span class="p">){</span>
</span><span class='line'>          
</span><span class='line'>          <span class="kd">var</span> <span class="nx">src</span> <span class="o">=</span> <span class="nx">arg</span><span class="p">.</span><span class="nx">src</span> <span class="o">||</span> <span class="nx">arguments</span><span class="p">[</span><span class="mi">0</span><span class="p">]</span> <span class="o">||</span> <span class="s1">&#39;&#39;</span><span class="p">,</span>
</span><span class='line'>              <span class="nx">src</span> <span class="o">=</span> <span class="nx">src</span><span class="p">.</span><span class="nx">replace</span><span class="p">(</span><span class="sr">/\/s\d*\//</span><span class="p">,</span> <span class="s1">&#39;/s&#39;</span><span class="o">+</span><span class="nx">imgWid</span> <span class="o">*</span> <span class="nx">hdpi</span><span class="o">+</span><span class="s1">&#39;/&#39;</span><span class="p">),</span> <span class="c1">//picasa image size replacing (s340 to device width)</span>
</span><span class='line'>              <span class="nx">title</span> <span class="o">=</span> <span class="nx">arg</span><span class="p">.</span><span class="nx">title</span> <span class="o">||</span> <span class="nx">arg</span><span class="p">.</span><span class="nx">alt</span> <span class="o">||</span> <span class="nx">arguments</span><span class="p">[</span><span class="mi">1</span><span class="p">]</span> <span class="o">||</span> <span class="s1">&#39;&#39;</span><span class="p">,</span>
</span><span class='line'>              <span class="nx">alt</span> <span class="o">=</span> <span class="nx">arg</span><span class="p">.</span><span class="nx">alt</span> <span class="o">||</span> <span class="nx">arg</span><span class="p">.</span><span class="nx">title</span> <span class="o">||</span> <span class="nx">arguments</span><span class="p">[</span><span class="mi">2</span><span class="p">]</span> <span class="o">||</span> <span class="nx">arguments</span><span class="p">[</span><span class="mi">1</span><span class="p">]</span> <span class="o">||</span> <span class="s1">&#39;&#39;</span><span class="p">,</span>
</span><span class='line'>              <span class="nx">attributes</span> <span class="o">=</span> <span class="nx">arg</span><span class="p">.</span><span class="nx">attr</span> <span class="o">||</span> <span class="nx">arguments</span><span class="p">[</span><span class="mi">3</span><span class="p">]</span> <span class="o">||</span> <span class="s1">&#39;&#39;</span><span class="p">,</span>
</span><span class='line'>              <span class="nx">img</span> <span class="o">=</span> <span class="nx">tpl</span><span class="p">.</span><span class="nx">replace</span><span class="p">(</span><span class="s1">&#39;{src}&#39;</span><span class="p">,</span><span class="nx">src</span><span class="p">).</span><span class="nx">replace</span><span class="p">(</span><span class="s1">&#39;{title}&#39;</span><span class="p">,</span><span class="nx">title</span><span class="p">).</span><span class="nx">replace</span><span class="p">(</span><span class="s1">&#39;{alt}&#39;</span><span class="p">,</span><span class="nx">alt</span><span class="p">).</span><span class="nx">replace</span><span class="p">(</span><span class="s1">&#39;{rwdImgId}&#39;</span><span class="p">,</span><span class="nx">rwdImgId</span><span class="p">).</span><span class="nx">replace</span><span class="p">(</span><span class="s1">&#39;{attributes}&#39;</span><span class="p">,</span><span class="nx">attributes</span><span class="p">);</span>
</span><span class='line'>              <span class="nb">document</span><span class="p">.</span><span class="nx">write</span><span class="p">(</span><span class="nx">img</span><span class="p">)</span>
</span><span class='line'>      <span class="p">}</span>
</span><span class='line'>  <span class="p">};</span>
</span><span class='line'><span class="p">}()</span>
</span><span class='line'><span class="o">&lt;</span><span class="err">/script&gt;</span>
</span></code></pre></td></tr></table></div></figure>


<p>
Paste it in your page header. This will set width of the screen into ‘cwResImg’ variable. You can set image breakpoints in this variable <code>cwBpArry = [1382, 992, 768, 480];</code></p>

<p><strong><em>HTML</em></strong> <br>
Replace images in HTML with.</p>

<figure class='code'><figcaption><span></span></figcaption><div class="highlight"><table><tr><td class="gutter"><pre class="line-numbers"><span class='line-number'>1</span>
<span class='line-number'>2</span>
<span class='line-number'>3</span>
<span class='line-number'>4</span>
<span class='line-number'>5</span>
<span class='line-number'>6</span>
<span class='line-number'>7</span>
<span class='line-number'>8</span>
<span class='line-number'>9</span>
<span class='line-number'>10</span>
</pre></td><td class='code'><pre><code class='html'><span class='line'><span class="nt">&lt;noscript&gt;</span>
</span><span class='line'>  <span class="nt">&lt;img</span> <span class="na">src=</span><span class="s">&quot;http://lh6.googleusercontent.com/-nI33VLdtmFo/UN9MmPN6bHI/AAAAAAAAFEE/1uJBJ7-plEs/s720/Webpagetest-IE8-Octopress-Default-waterfall.png&quot;</span> <span class="na">alt=</span><span class="s">&quot;Responsive images test&quot;</span><span class="nt">&gt;</span>
</span><span class='line'><span class="nt">&lt;/noscript&gt;</span>
</span><span class='line'><span class="nt">&lt;script&gt;</span>
</span><span class='line'>  <span class="nx">cwResImg</span><span class="p">.</span><span class="nx">rwdImg</span><span class="p">(</span><span class="s2">&quot;http://lh6.googleusercontent.com/-nI33VLdtmFo/UN9MmPN6bHI/AAAAAAAAFEE/1uJBJ7-plEs/s450/Webpagetest-IE8-Octopress-Default-waterfall.png&quot;</span><span class="p">,</span> <span class="s1">&#39;Responsive images text script&#39;</span><span class="p">);</span>
</span><span class='line'>
</span><span class='line'>  <span class="o">---</span><span class="nx">or</span><span class="o">----</span>
</span><span class='line'>
</span><span class='line'>  <span class="nx">cwResImg</span><span class="p">.</span><span class="nx">rwdImg</span><span class="p">({</span><span class="nx">src</span><span class="o">:</span><span class="s1">&#39;http://lh6.googleusercontent.com/-nI33VLdtmFo/UN9MmPN6bHI/AAAAAAAAFEE/1uJBJ7-plEs/s450/Webpagetest-IE8-Octopress-Default-waterfall.png&#39;</span><span class="p">,</span> <span class="nx">alt</span><span class="o">:</span><span class="s1">&#39;Responsive images text script&#39;</span><span class="p">,</span> <span class="nx">title</span><span class="o">:</span><span class="s1">&#39;Responsive images text script&#39;</span><span class="p">});</span>
</span><span class='line'><span class="nt">&lt;/script&gt;</span>
</span></code></pre></td></tr></table></div></figure>


<p>It has two parts <br>
1) noscript tag contains a standard image for fallback. If js is not supported, this image will show.</p>

<p>2) Script part <br>
Syntax</p>

<figure class='code'><figcaption><span></span></figcaption><div class="highlight"><table><tr><td class="gutter"><pre class="line-numbers"><span class='line-number'>1</span>
<span class='line-number'>2</span>
<span class='line-number'>3</span>
</pre></td><td class='code'><pre><code class='javascript'><span class='line'><span class="nx">cwResImg</span><span class="p">.</span><span class="nx">rwdImg</span><span class="p">(</span><span class="s2">&quot;src&quot;</span><span class="p">,</span><span class="s2">&quot;alt&quot;</span><span class="p">,</span><span class="s2">&quot;title&quot;</span><span class="p">,</span><span class="s2">&quot;class=&#39;myclass&#39;&quot;</span><span class="p">);</span>
</span><span class='line'><span class="nx">or</span>
</span><span class='line'><span class="nx">cwResImg</span><span class="p">.</span><span class="nx">rwdImg</span><span class="p">({</span><span class="nx">src</span><span class="o">:</span><span class="s2">&quot;src&quot;</span><span class="p">,</span> <span class="nx">alt</span><span class="o">:</span><span class="s2">&quot;alt&quot;</span><span class="p">,</span><span class="nx">title</span><span class="o">:</span><span class="s2">&quot;title&quot;</span><span class="p">,</span><span class="nx">attr</span><span class="o">:</span><span class="s2">&quot;class=&#39;myclass&#39;&quot;</span><span class="p">})</span>
</span></code></pre></td></tr></table></div></figure>


<figure class='code'><figcaption><span></span></figcaption><div class="highlight"><table><tr><td class="gutter"><pre class="line-numbers"><span class='line-number'>1</span>
</pre></td><td class='code'><pre><code class='javascript'><span class='line'><span class="nx">cwResImg</span><span class="p">.</span><span class="nx">rwdImg</span><span class="p">(</span><span class="s2">&quot;http://lh6.googleusercontent.com/-nI33VLdtmFo/UN9MmPN6bHI/AAAAAAAAFEE/1uJBJ7-plEs/s450/Webpagetest-IE8-Octopress-Default-waterfall.png&quot;</span><span class="p">,</span><span class="s2">&quot;Responsive images text script&quot;</span><span class="p">,</span><span class="s2">&quot;Responsive images text script&quot;</span><span class="p">);</span>
</span></code></pre></td></tr></table></div></figure>


<p>JavaScript variable ‘cwResImg’ will replace by the max width of the device.</p>

<p>When page loads url will be like the following, if its a desktop with resolution more than 1382px</p>

<p>//lh6.googleusercontent.com/-IdiwvKGQ8Lk/UN9KOZvdW7I/AAAAAAAAFDk/iSvy1_SZrrM/<strong>s1382</strong>/RTT%2520Decodize%2520github.png</p>

<h3>Demo</h3>

<p><a href="http://demos.decodize.com/responsive-images/demo.html" title="Responsive images&quot; target=&quot;_blank">Responsive images</a></p>

<h3>Performance and Bandwidth</h3>

<p>After including this there is a noticeable performance improvement in iPhone waterfall view.</p>

<p>Before (11.866s) <br>
<noscript>
<img src="//lh6.googleusercontent.com/-VQbJXZuyy2g/UOXNzTDn7EI/AAAAAAAAFGY/4WE49NLo3Os/s800/Before%2520responsive%2520image.jpg" alt="Before responsive image" title="Before responsive image">
</noscript><script>
cwResImg.rwdImg(&ldquo;//lh6.googleusercontent.com/-VQbJXZuyy2g/UOXNzTDn7EI/AAAAAAAAFGY/4WE49NLo3Os/s800/Before%2520responsive%2520image.jpg&rdquo;,&ldquo;Before responsive image&rdquo;);
</script></p>

<p>After (8.841s) <br>
<noscript>
<img src="//lh5.googleusercontent.com/-M18BajmhKdE/UOXNzNWfpvI/AAAAAAAAFGU/RIjb8u81HeI/s800/After%2520responsive%2520image.jpg" alt="After responsive image" title="After responsive image">
</noscript><script>
cwResImg.rwdImg(&ldquo;//lh5.googleusercontent.com/-M18BajmhKdE/UOXNzNWfpvI/AAAAAAAAFGU/RIjb8u81HeI/s800/After%2520responsive%2520image.jpg&rdquo;,&ldquo;After responsive image&rdquo;);
</script></p>

<p><strong><em>Drawbacks</em></strong> <br>
Messy HTML. <br>
Accessibility</p>
]]></content>
  </entry>
  
  <entry>
    <title type="html"><![CDATA[Moving From Wordpress to Octopress Redesign Notes]]></title>
    <link href="http://praveenvijayan.github.io/blog/2012/12/30/moving-from-wordpress-to-octopress/"/>
    <updated>2012-12-30T00:00:00+05:30</updated>
    <id>http://praveenvijayan.github.io/blog/2012/12/30/moving-from-wordpress-to-octopress</id>
    <content type="html"><![CDATA[<h2>Why I migrated from Wordpress to Octopress.</h2>

<p><strong><em>Speed and performance</em></strong> <br>
Octopress framework uses <a href="https://github.com/mojombo/jekyll">Jekyll</a> <a href="https://github.com/mojombo/jekyll/wiki" title="Static Site Generator">SSG (Static Site Generator)</a> to build pages. All pages are static and no server side processing involved. Requested page can deliver instantaneously by the server into user&rsquo;s machine.</p>

<p><strong><em>Hosted at Github</em></strong> <br>
Site is hosted on Github as <a href="https://help.github.com/articles/what-are-github-pages">Github Pages</a>. Since its in Github, server uptime and response time are guaranteed.</p>

<p><strong><em>Ease of use</em></strong> <br>
After setting up everything, 2 steps involved in creating and publishing your next post</p>

<pre><code>$ rake new_post["new post"]
$ rake deploy.
</code></pre>

<p><strong><em>Markdown</em></strong> <br>
Octopress uses <a href="http://daringfireball.net/projects/markdown/" title="Markdown">Markdown</a>. Its simple &amp; clean as writing a text file/email.</p>

<!-- more -->


<p><strong><em>Clear, simple &amp; responsive Octopress theme</em></strong> <br>
Octopress theme is responsive and fit nicely in tablet and phones. Theme built with HTML 5 Boilerplate(HB5) &amp; SCSS.</p>

<p><strong><em>Editor freedom</em></strong> <br>
No more miss-formatted posts, adjustment &lsquo;&lt;br&gt;&rsquo; or switching between ‘HTML’ and &lsquo;Visual&rsquo; tab in wp post editor to align content correctly. You can use any text editor to write blog post.</p>

<p><strong><em>No DB / No Dynamic pages </em></strong><br>
No DB, no dynamic pages, no routing etc.. Everything is static, so no server side processing costs involved.</p>

<p><strong><em>Minimal page weight</em></strong><br>
Semantic markup and no unnecessary tag inclusion by cms.</p>

<p><strong><em>Improved RTT</em></strong><br>
RTT (Round trip delay) are better and shorter now.</p>

<p>Old wordpress site
<noscript>
<img src="//lh5.googleusercontent.com/-Ht__EMuyHO0/UN9KN_USHAI/AAAAAAAAFDg/4SJUk6b1CP8/w800/RTT%2520Kerala%2520eco%2520conference%2520.png" alt="Responsive images text script">
</noscript><script>
document.write(&lsquo;<img src="//lh5.googleusercontent.com/-Ht__EMuyHO0/UN9KN_USHAI/AAAAAAAAFDg/4SJUk6b1CP8/w'+cwResImg.imgWid+'/RTT%2520Kerala%2520eco%2520conference%2520.png" alt="Responsive images text script">&rsquo;)
</script></p>

<p>Octopress Github page
<noscript>
<img src="//lh6.googleusercontent.com/-IdiwvKGQ8Lk/UN9KOZvdW7I/AAAAAAAAFDk/iSvy1_SZrrM/w800/RTT%2520Decodize%2520github.png" alt="Round trip delay after">
</noscript><script>
document.write(&lsquo;<img src="//lh6.googleusercontent.com/-IdiwvKGQ8Lk/UN9KOZvdW7I/AAAAAAAAFDk/iSvy1_SZrrM/w'+cwResImg.imgWid+'/RTT%2520Decodize%2520github.png" alt="Round trip delay after">&rsquo;)
</script></p>

<p>Tested using <a href="http://just-ping.com/" title="Just ping">just-ping.com</a></p>

<p><strong><em>No more plugin hassle</em></strong><br>
Bye bye to w3 total cache, SEO plugins, broken and heavy social plugins etc..</p>

<p><strong><em>Version control and Collaboration</em></strong><br>
Pages are hosted in Github, version control comes naturally. Collaboration is possible through fork &amp; pull requests.</p>

<p><strong><em>More control over script loading</em></strong><br>
Its difficult to edit/delete scripts and css loaded by third party plugins in wordpress. In Octopress it like editing html file.</p>

<p><strong><em>Better security</em></strong><br>
This site was hacked once. Wordpress has security flaws. Github is more secured than wordpress.</p>

<p><strong><em>Preloaded plugins</em></strong><br>
Octopress comes with some default plugins - Disqus, Twitter, Delicious, Facebook, Pinterest, Analytics etc..</p>

<p><strong><em>Migration options</em></strong><br>
You can switch from other blogging platforms (wp, drupal etc..) to octopress without much frustration.</p>

<p><strong><em>Other SSG Options</em></strong><br>
If octopress sucks somewhere, other options are available <a href="http://news.ycombinator.com/item?id=4857473">Hacker news</a>, <a href="http://iwantmyname.com/blog/2011/02/list-static-website-generators.html">List of SSG</a></p>

<h3>Tips, SEO &amp; performance</h3>

<p><strong><em>Migrating posts from wordpress</em></strong><br>
I have tried ‘WordPress to Jekyll Exporter’ but it didn’t worked for me. Since, I have manageable no of posts, I manually converted all of them into markdown. If you have too many posts, <a href="https://github.com/thomasf/exitwp" title="Exitwp">Exitwp</a> may be a good option.</p>

<p><strong><em>URL mapping</em></strong><br>
Octopress default permalink structure is /blog/:year/:month/:day/:title/. We have to set it right with old wp permalink structure. I changed it to /:categories/:title/. We can configure it in _config.yml.</p>

<p><strong><em>Social links</em></strong><br>
Set all social, search, feed links configuration settings in _config.yml.</p>

<pre><code># Github repositories
github_user:
github_repo_count: 4
github_show_profile_link: true
github_skip_forks: true

# Twitter
twitter_user:
twitter_tweet_count: 4
twitter_show_replies: false
twitter_follow_button: true
twitter_show_follower_count: false
twitter_tweet_button: true

# Google +1
google_plus_one: true
google_plus_one_size: medium

# Google Plus Profile
# Hidden: No visible button, just add author information to search results
googleplus_user:
googleplus_hidden: false

# Pinboard
pinboard_user:
pinboard_count: 3

# Delicious
delicious_user:
delicious_count: 3

# Disqus Comments
disqus_short_name:
disqus_show_comment_count: false

# Google Analytics
google_analytics_tracking_id:

# Facebook Like
facebook_like: yes
</code></pre>

<p><strong><em>SEO</em></strong><br>
Octopress won&rsquo;t create keywords and description for each post. Added two new fields, keyword and description on each new post for better SEO optimizations.</p>

<pre><code>---
layout: post
title: "Moving from Wordpress to Octopress redesign notes"
date: 2012-12-30 00:00
comments: true
categories: html

keywords: octopress, static site generators (SSG), performance, optimization, SEO octopress, wordpress, Jekyll, GitHub
description: Re-design note on migrating from wordpress to octopress. Note includes octopress optimization, octopress SEO tips.
---
</code></pre>

<p><strong><em>Google analytics</em></strong><br>
Added google Analytics ID in _config.yml and included {&nbsp;% include google_analytics.html %} in custom footer.  Otherwise google analytics won’t appear in all page.</p>

<pre><code># Google Analytics
google_analytics_tracking_id:
</code></pre>

<p><strong><em>Disqus</em></strong><br>
Added Disqus shortname in ‘disqus_short_name:’ field. You must migrate all comments to new domain in order to appear it in new site. Login to your disqus account. Go to Admin > Migrate threads tab.  Run domain migration wizard. It might take a full day to populate all comments in your blog.</p>

<p>_config.yml
    # Disqus Comments
    disqus_short_name:
    disqus_show_comment_count: false</p>

<p>login to disqus.com</p>

<p><noscript>
<img src="//lh3.googleusercontent.com/-oQlo1HNnRDw/UN9MnzGMM9I/AAAAAAAAFEM/nqeW80edwqs/w800/Disqus%2520migration.png" alt="Discuss comment migration" title="Discuss comment migration">
</noscript><script>
document.write(&lsquo;<img src="//lh3.googleusercontent.com/-oQlo1HNnRDw/UN9MnzGMM9I/AAAAAAAAFEM/nqeW80edwqs/w'+cwResImg.imgWid+'/Disqus%2520migration.png" alt="Discuss comment migration" title="Discuss comment migration">&rsquo;)
</script></p>

<p><strong><em>Images and videos</em></strong><br>
I have hosted media on <a href="https://picasaweb.google.com">picasaweb google</a>. Its better to host all your media like images and videos in flickr or google picasa.</p>

<p>Advantages of uploading images in picasa are <br>
1) Images will be delivered from CDN (free). <br>
2) Images will cache &amp; resize on the fly. <br>
3) We can create custom image sizes. <br>
4) <a href="http://support.google.com/picasa/answer/13821?hl=en">Optimize image</a> by selecting image quality.</p>

<pre><code>//lh3.googleusercontent.com/-Rw0hpxt70co/ULeX80ncW3I/AAAAAAAAE6g/kIDj6u1zdyI/s640/query-loader1.jpg
</code></pre>

<p>s640 - is the key. It will set image size to 640. Also, we can use w640 or h640. This values will restrict width and height respectively.</p>

<p>AAAAAAAAE6g/kIDj6u1zdyI/<strong>s100</strong>/query-loader1.jpg  - <small>width/height 100px</small>  <br>
AAAAAAAAE6g/kIDj6u1zdyI/<strong>w200</strong>/query-loader1.jpg  - <small>width 200px </small> <br>
AAAAAAAAE6g/kIDj6u1zdyI/<strong>h50</strong>/query-loader1.jpg  - <small> height 50px </small></p>

<p>5) Automatic <a href="http://www.stevesouders.com/blog/2009/05/12/sharding-dominant-domains/">domain sharding</a> by google for uploaded images.</p>

<p>Browser has restriction on concurrent connections per hostname (HTTP1.1 states its 2 connections, but modern browsers has more than that - <a href="http://www.browserscope.org/?category=network&amp;v=top" title="Browserscope">check here</a>. Advantage of domain sharding is browser can parallelly download more resources. Following are some locations from where image is fetching.</p>

<pre><code>lh3.googleusercontent.com
lh4.googleusercontent.com
lh5.googleusercontent.com
lh6.googleusercontent.com
</code></pre>

<p><strong><em>Performance improvements</em></strong><br>
All pages are static. HTML files will quickly downloaded into user’s machine. Following are some changes I made in default files to leverage performance.</p>

<ol type="a">
<li>Moved google font api file to top</li>
</ol>


<p>includes/custom/head.html - file contains google fontface css. <code> {&#37; include custom/head.html %} </code> moved above all scripts tag.</p>

<figure class='code'><figcaption><span></span></figcaption><div class="highlight"><table><tr><td class="gutter"><pre class="line-numbers"><span class='line-number'>1</span>
<span class='line-number'>2</span>
<span class='line-number'>3</span>
<span class='line-number'>4</span>
<span class='line-number'>5</span>
<span class='line-number'>6</span>
<span class='line-number'>7</span>
<span class='line-number'>8</span>
</pre></td><td class='code'><pre><code class='html'><span class='line'><span class="nt">&lt;link</span> <span class="na">rel=</span><span class="s">&quot;canonical&quot;</span> <span class="na">href=</span><span class="s">&quot;&quot;</span><span class="nt">&gt;</span>
</span><span class='line'><span class="nt">&lt;link</span> <span class="na">href=</span><span class="s">&quot;/favicon.ico&quot;</span> <span class="na">rel=</span><span class="s">&quot;icon&quot;</span><span class="nt">&gt;</span>
</span><span class='line'>{ % include custom/head.html %} //Moved above all script tags
</span><span class='line'><span class="nt">&lt;link</span> <span class="na">href=</span><span class="s">&quot;/stylesheets/screen.css&quot;</span> <span class="na">media=</span><span class="s">&quot;screen, projection&quot;</span> <span class="na">rel=</span><span class="s">&quot;stylesheet&quot;</span> <span class="na">type=</span><span class="s">&quot;text/css&quot;</span><span class="nt">&gt;</span>
</span><span class='line'><span class="nt">&lt;script </span><span class="na">src=</span><span class="s">&quot;/javascripts/modernizr-2.0.js&quot;</span><span class="nt">&gt;&lt;/script&gt;</span>
</span><span class='line'><span class="nt">&lt;script </span><span class="na">src=</span><span class="s">&quot;/javascripts/ender.js&quot;</span><span class="nt">&gt;&lt;/script&gt;</span>
</span><span class='line'><span class="nt">&lt;script </span><span class="na">src=</span><span class="s">&quot;/javascripts/octopress.js&quot;</span> <span class="na">type=</span><span class="s">&quot;text/javascript&quot;</span><span class="nt">&gt;&lt;/script&gt;</span>
</span><span class='line'><span class="nt">&lt;link</span> <span class="na">href=</span><span class="s">&quot;/atom.xml&quot;</span> <span class="na">rel=</span><span class="s">&quot;alternate&quot;</span> <span class="na">title=</span><span class="s">&quot;Decodize&quot;</span> <span class="na">type=</span><span class="s">&quot;application/atom+xml&quot;</span><span class="nt">&gt;</span>
</span></code></pre></td></tr></table></div></figure>


<p>Its always better to load css first.</p>

<p>II. Reduce SSL negotiation time by removing <a href="https:">https:</a> from image src.
I&rsquo;m using google picasa as my media host, so urls are <a href="https://">https://</a> by default. I didn&rsquo;t noticed SSL negotiation time in IE until I tested site in <a href="http://www.webpagetest.org/">wepagetest.org</a>.</p>

<pre><code>https://lh3.googleusercontent.com/-myRXm2caL_w/UFGha2n2IMI/AAAAAAAAEeA/NuBd3P0YJ0Y/s700/Yeoman.png
</code></pre>

<p>Chrome dev tool won&rsquo;t display this delay, since chrome SSL negotiations are unnoticeable.</p>

<p>Following is the webpage test result in IE</p>

<p>Before (8.087s) <br>
<noscript>
<img src="//lh6.googleusercontent.com/-nI33VLdtmFo/UN9MmPN6bHI/AAAAAAAAFEE/1uJBJ7-plEs/w800/Webpagetest-IE8-Octopress-Default-waterfall.png" alt="IE with SSL Negotiation" title="IE with SSL Negotiation">
</noscript><script>
document.write(&lsquo;<img src="//lh6.googleusercontent.com/-nI33VLdtmFo/UN9MmPN6bHI/AAAAAAAAFEE/1uJBJ7-plEs/w'+cwResImg.imgWid+'/Webpagetest-IE8-Octopress-Default-waterfall.png" alt="IE with SSL Negotiation" title="IE with SSL Negotiation">&rsquo;)
</script></p>

<p>After (4.019s) <br>
<noscript>
<img src="//lh4.googleusercontent.com/-ddWa47F1i6M/UN9MqTf7C7I/AAAAAAAAFEU/SU3C8Z6iuGw/s800/Webpage%2520test-IE8-Octopress-Optimised-waterfall.png" alt="IE without SSL Negotiation" title="IE without SSL Negotiation">
</noscript><script>
document.write(&lsquo;<img src="//lh4.googleusercontent.com/-ddWa47F1i6M/UN9MqTf7C7I/AAAAAAAAFEU/SU3C8Z6iuGw/s'+cwResImg.imgWid+'/Webpage%2520test-IE8-Octopress-Optimised-waterfall.png" alt="IE without SSL Negotiation" title="IE without SSL Negotiation">&rsquo;)
</script></p>

<p>III. Behavior of loading third party scripts. Following third party scripts are loading in this site</p>

<p>Google analytics <br>
Twitter recent files <br>
Facebook <br>
Google+ <br>
Twitter share <br>
Disqus</p>

<p>There will be a huge performance improvement when we load all the third-party scripts after pageload event. Octopress is using <a href="http://www.phpied.com/social-button-bffs/">Social button BFFs</a> to load scripts asynchronously (also async in script). But its not enough <a href="http://www.aaronpeters.nl/blog/why-loading-third-party-scripts-async-is-not-good-enough">Check this link</a>, third party scripts are still blocking or using network resources of the original site content. There is no use of loading third party script with out loading actual site contents first. So we have to load all social stuffs after page load.</p>

<p>Following waterfall is from an inside page.</p>

<p>Before optimization : Dom loaded [blue line] 18.330s and Start render at 4.312s<br>
<noscript>
<img src="//lh6.googleusercontent.com/-ksYcr5Gbruc/UOCCVvijlRI/AAAAAAAAFEw/GsCRmWDu5IQ/w800/Webpagetest-IE-Octopress-Defaults-Detail-page-Waterfall-01.jpg" alt="Before optimization" title="Before optimization">
</noscript><script>
document.write(&lsquo;<img src="//lh6.googleusercontent.com/-ksYcr5Gbruc/UOCCVvijlRI/AAAAAAAAFEw/GsCRmWDu5IQ/w'+cwResImg.imgWid+'/Webpagetest-IE-Octopress-Defaults-Detail-page-Waterfall-01.jpg" alt="Before optimization" title="Before optimization">&rsquo;)
</script></p>

<p>After optimization : Dom loaded [Blue line] 4.019s and Start render at 2.679s<br>
<noscript>
<img src="//lh5.googleusercontent.com/-g9fnDhqrhP8/UOCDyeFvdUI/AAAAAAAAFFY/DgJqsCNW9Ls/w800/Webpagetest-IE-optimised-details.png" alt="After optimization" title="After optimization">
</noscript><script>
document.write(&lsquo;<img src="//lh5.googleusercontent.com/-g9fnDhqrhP8/UOCDyeFvdUI/AAAAAAAAFFY/DgJqsCNW9Ls/w'+cwResImg.imgWid+'/Webpagetest-IE-optimised-details.png" alt="After optimization" title="After optimization">&rsquo;)
</script></p>

<p>When you compare above waterfalls, in second one all social and sharing scripts and resources initiated by them are start loading only after onload event.</p>

<p>When we insert third party scripts it not only loads and parse. It also requests another scripts and image resources. When we inserting it on document ready, our original site content is still loading. Third party resource requests will block network. It not only helps to reduce network requests but, also helps browser for better Garbage collection and faster painting. Quicker onload event help to execute our custom scripts on dom much earlier (eg: show/hide some element, show message etc..)</p>

<p>Changes made on following files inside <code>source/_includes</code></p>

<pre><code>twitter_sharing.html
google_plus_one.html
facebook_like.html
disqus.html
asides/twitter.html
</code></pre>

<p>I have used modified version of lazy loading third party scripts.</p>

<figure class='code'><figcaption><span></span></figcaption><div class="highlight"><table><tr><td class="gutter"><pre class="line-numbers"><span class='line-number'>1</span>
<span class='line-number'>2</span>
<span class='line-number'>3</span>
<span class='line-number'>4</span>
<span class='line-number'>5</span>
<span class='line-number'>6</span>
<span class='line-number'>7</span>
<span class='line-number'>8</span>
<span class='line-number'>9</span>
<span class='line-number'>10</span>
<span class='line-number'>11</span>
<span class='line-number'>12</span>
<span class='line-number'>13</span>
<span class='line-number'>14</span>
<span class='line-number'>15</span>
<span class='line-number'>16</span>
</pre></td><td class='code'><pre><code class='html'><span class='line'><span class="nt">&lt;script&gt;</span>
</span><span class='line'><span class="p">(</span><span class="kd">function</span><span class="p">(</span><span class="nx">w</span><span class="p">,</span> <span class="nx">d</span><span class="p">,</span> <span class="nx">s</span><span class="p">)</span> <span class="p">{</span>
</span><span class='line'>  <span class="kd">function</span> <span class="nx">go</span><span class="p">(){</span>
</span><span class='line'>    <span class="kd">var</span> <span class="nx">js</span><span class="p">,</span> <span class="nx">fjs</span> <span class="o">=</span> <span class="nx">d</span><span class="p">.</span><span class="nx">getElementsByTagName</span><span class="p">(</span><span class="nx">s</span><span class="p">)[</span><span class="mi">0</span><span class="p">],</span> <span class="nx">load</span> <span class="o">=</span> <span class="kd">function</span><span class="p">(</span><span class="nx">url</span><span class="p">,</span> <span class="nx">id</span><span class="p">)</span> <span class="p">{</span>
</span><span class='line'>    <span class="k">if</span> <span class="p">(</span><span class="nx">d</span><span class="p">.</span><span class="nx">getElementById</span><span class="p">(</span><span class="nx">id</span><span class="p">))</span> <span class="p">{</span><span class="k">return</span><span class="p">;}</span>
</span><span class='line'>    <span class="nx">js</span> <span class="o">=</span> <span class="nx">d</span><span class="p">.</span><span class="nx">createElement</span><span class="p">(</span><span class="nx">s</span><span class="p">);</span> <span class="nx">js</span><span class="p">.</span><span class="nx">src</span> <span class="o">=</span> <span class="nx">url</span><span class="p">;</span> <span class="nx">js</span><span class="p">.</span><span class="nx">id</span> <span class="o">=</span> <span class="nx">id</span><span class="p">;</span>
</span><span class='line'>    <span class="nx">fjs</span><span class="p">.</span><span class="nx">parentNode</span><span class="p">.</span><span class="nx">insertBefore</span><span class="p">(</span><span class="nx">js</span><span class="p">,</span> <span class="nx">fjs</span><span class="p">);</span>
</span><span class='line'>  <span class="p">};</span>
</span><span class='line'>    <span class="nx">load</span><span class="p">(</span><span class="s1">&#39;//connect.facebook.net/en_US/all.js#appId=272697932759946&amp;xfbml=1&#39;</span><span class="p">,</span> <span class="s1">&#39;fbjssdk&#39;</span><span class="p">);</span>
</span><span class='line'>    <span class="nx">load</span><span class="p">(</span><span class="s1">&#39;https://apis.google.com/js/plusone.js&#39;</span><span class="p">,</span> <span class="s1">&#39;gplus1js&#39;</span><span class="p">);</span>
</span><span class='line'>    <span class="nx">load</span><span class="p">(</span><span class="s1">&#39;//platform.twitter.com/widgets.js&#39;</span><span class="p">,</span> <span class="s1">&#39;tweetjs&#39;</span><span class="p">);</span>
</span><span class='line'>  <span class="p">}</span>
</span><span class='line'>  <span class="k">if</span> <span class="p">(</span><span class="nx">w</span><span class="p">.</span><span class="nx">addEventListener</span><span class="p">)</span> <span class="p">{</span> <span class="nx">w</span><span class="p">.</span><span class="nx">addEventListener</span><span class="p">(</span><span class="s2">&quot;load&quot;</span><span class="p">,</span> <span class="nx">go</span><span class="p">,</span> <span class="kc">false</span><span class="p">);</span> <span class="p">}</span>
</span><span class='line'>  <span class="k">else</span> <span class="k">if</span> <span class="p">(</span><span class="nx">w</span><span class="p">.</span><span class="nx">attachEvent</span><span class="p">)</span> <span class="p">{</span> <span class="nx">w</span><span class="p">.</span><span class="nx">attachEvent</span><span class="p">(</span><span class="s2">&quot;onload&quot;</span><span class="p">,</span><span class="nx">go</span><span class="p">);</span> <span class="p">}</span>
</span><span class='line'><span class="p">}(</span><span class="nb">window</span><span class="p">,</span> <span class="nb">document</span><span class="p">,</span> <span class="s1">&#39;script&#39;</span><span class="p">));</span>
</span><span class='line'><span class="nt">&lt;/script&gt;</span>
</span></code></pre></td></tr></table></div></figure>


<p>1) twitter_sharing.html</p>

<figure class='code'><figcaption><span></span></figcaption><div class="highlight"><table><tr><td class="gutter"><pre class="line-numbers"><span class='line-number'>1</span>
<span class='line-number'>2</span>
<span class='line-number'>3</span>
<span class='line-number'>4</span>
<span class='line-number'>5</span>
<span class='line-number'>6</span>
<span class='line-number'>7</span>
<span class='line-number'>8</span>
<span class='line-number'>9</span>
<span class='line-number'>10</span>
<span class='line-number'>11</span>
<span class='line-number'>12</span>
<span class='line-number'>13</span>
<span class='line-number'>14</span>
</pre></td><td class='code'><pre><code class='html'><span class='line'><span class="nt">&lt;script&gt;</span>
</span><span class='line'>  <span class="p">(</span><span class="kd">function</span><span class="p">(</span><span class="nx">w</span><span class="p">,</span> <span class="nx">d</span><span class="p">,</span> <span class="nx">s</span><span class="p">)</span> <span class="p">{</span>
</span><span class='line'>    <span class="kd">function</span> <span class="nx">go</span><span class="p">(){</span>
</span><span class='line'>      <span class="kd">var</span> <span class="nx">js</span><span class="p">,</span> <span class="nx">fjs</span> <span class="o">=</span> <span class="nx">d</span><span class="p">.</span><span class="nx">getElementsByTagName</span><span class="p">(</span><span class="nx">s</span><span class="p">)[</span><span class="mi">0</span><span class="p">],</span> <span class="nx">load</span> <span class="o">=</span> <span class="kd">function</span><span class="p">(</span><span class="nx">url</span><span class="p">,</span> <span class="nx">id</span><span class="p">)</span> <span class="p">{</span>
</span><span class='line'>        <span class="k">if</span> <span class="p">(</span><span class="nx">d</span><span class="p">.</span><span class="nx">getElementById</span><span class="p">(</span><span class="nx">id</span><span class="p">))</span> <span class="p">{</span><span class="k">return</span><span class="p">;}</span>
</span><span class='line'>        <span class="nx">js</span> <span class="o">=</span> <span class="nx">d</span><span class="p">.</span><span class="nx">createElement</span><span class="p">(</span><span class="nx">s</span><span class="p">);</span> <span class="nx">js</span><span class="p">.</span><span class="nx">src</span> <span class="o">=</span> <span class="nx">url</span><span class="p">;</span> <span class="nx">js</span><span class="p">.</span><span class="nx">id</span> <span class="o">=</span> <span class="nx">id</span><span class="p">;</span> <span class="nx">js</span><span class="p">.</span><span class="nx">async</span> <span class="o">=</span> <span class="kc">true</span><span class="p">;</span>
</span><span class='line'>        <span class="nx">fjs</span><span class="p">.</span><span class="nx">parentNode</span><span class="p">.</span><span class="nx">insertBefore</span><span class="p">(</span><span class="nx">js</span><span class="p">,</span> <span class="nx">fjs</span><span class="p">);</span>
</span><span class='line'>      <span class="p">};</span>
</span><span class='line'>      <span class="nx">load</span><span class="p">(</span><span class="s1">&#39;http://platform.twitter.com/widgets.js&#39;</span><span class="p">,</span> <span class="s1">&#39;twitterwid&#39;</span><span class="p">);</span>
</span><span class='line'>    <span class="p">}</span>
</span><span class='line'>    <span class="k">if</span> <span class="p">(</span><span class="nx">w</span><span class="p">.</span><span class="nx">addEventListener</span><span class="p">)</span> <span class="p">{</span> <span class="nx">w</span><span class="p">.</span><span class="nx">addEventListener</span><span class="p">(</span><span class="s2">&quot;load&quot;</span><span class="p">,</span> <span class="nx">go</span><span class="p">,</span> <span class="kc">false</span><span class="p">);</span> <span class="p">}</span>
</span><span class='line'>    <span class="k">else</span> <span class="k">if</span> <span class="p">(</span><span class="nx">w</span><span class="p">.</span><span class="nx">attachEvent</span><span class="p">)</span> <span class="p">{</span> <span class="nx">w</span><span class="p">.</span><span class="nx">attachEvent</span><span class="p">(</span><span class="s2">&quot;onload&quot;</span><span class="p">,</span><span class="nx">go</span><span class="p">);</span> <span class="p">}</span>
</span><span class='line'>  <span class="p">}(</span><span class="nb">window</span><span class="p">,</span> <span class="nb">document</span><span class="p">,</span> <span class="s1">&#39;script&#39;</span><span class="p">));</span>
</span><span class='line'><span class="nt">&lt;/script&gt;</span>
</span></code></pre></td></tr></table></div></figure>


<p>2) asides/twitter.html</p>

<p>Twitter feeds will only start loading after page completely loaded.</p>

<figure class='code'><figcaption><span></span></figcaption><div class="highlight"><table><tr><td class="gutter"><pre class="line-numbers"><span class='line-number'>1</span>
<span class='line-number'>2</span>
<span class='line-number'>3</span>
<span class='line-number'>4</span>
<span class='line-number'>5</span>
<span class='line-number'>6</span>
<span class='line-number'>7</span>
<span class='line-number'>8</span>
<span class='line-number'>9</span>
<span class='line-number'>10</span>
<span class='line-number'>11</span>
<span class='line-number'>12</span>
<span class='line-number'>13</span>
<span class='line-number'>14</span>
<span class='line-number'>15</span>
<span class='line-number'>16</span>
<span class='line-number'>17</span>
</pre></td><td class='code'><pre><code class='html'><span class='line'><span class="nt">&lt;script&gt;</span>
</span><span class='line'>    <span class="p">(</span><span class="kd">function</span><span class="p">(</span><span class="nx">w</span><span class="p">,</span> <span class="nx">d</span><span class="p">,</span> <span class="nx">s</span><span class="p">)</span> <span class="p">{</span>
</span><span class='line'>      <span class="kd">function</span> <span class="nx">go</span><span class="p">(){</span>
</span><span class='line'>        <span class="kd">var</span> <span class="nx">js</span><span class="p">,</span> <span class="nx">fjs</span> <span class="o">=</span> <span class="nx">d</span><span class="p">.</span><span class="nx">getElementsByTagName</span><span class="p">(</span><span class="nx">s</span><span class="p">)[</span><span class="mi">0</span><span class="p">],</span> <span class="nx">load</span> <span class="o">=</span> <span class="kd">function</span><span class="p">(</span><span class="nx">url</span><span class="p">,</span> <span class="nx">id</span><span class="p">)</span> <span class="p">{</span>
</span><span class='line'>        <span class="k">if</span> <span class="p">(</span><span class="nx">d</span><span class="p">.</span><span class="nx">getElementById</span><span class="p">(</span><span class="nx">id</span><span class="p">))</span> <span class="p">{</span><span class="k">return</span><span class="p">;}</span>
</span><span class='line'>        <span class="nx">js</span> <span class="o">=</span> <span class="nx">d</span><span class="p">.</span><span class="nx">createElement</span><span class="p">(</span><span class="nx">s</span><span class="p">);</span> <span class="nx">js</span><span class="p">.</span><span class="nx">src</span> <span class="o">=</span> <span class="nx">url</span><span class="p">;</span> <span class="nx">js</span><span class="p">.</span><span class="nx">id</span> <span class="o">=</span> <span class="nx">id</span><span class="p">;</span> <span class="nx">js</span><span class="p">.</span><span class="nx">async</span> <span class="o">=</span> <span class="kc">true</span><span class="p">;</span>
</span><span class='line'>        <span class="nx">$</span><span class="p">(</span><span class="nx">js</span><span class="p">).</span><span class="nx">load</span><span class="p">(</span><span class="kd">function</span><span class="p">(){</span>
</span><span class='line'>            <span class="nx">getTwitterFeed</span><span class="p">(</span><span class="s2">&quot;praveen_vijaya&quot;</span><span class="p">,</span> <span class="p">,</span> <span class="p">);</span>
</span><span class='line'>        <span class="p">});</span>
</span><span class='line'>        <span class="nx">fjs</span><span class="p">.</span><span class="nx">parentNode</span><span class="p">.</span><span class="nx">insertBefore</span><span class="p">(</span><span class="nx">js</span><span class="p">,</span> <span class="nx">fjs</span><span class="p">);</span>
</span><span class='line'>      <span class="p">};</span>
</span><span class='line'>        <span class="nx">load</span><span class="p">(</span><span class="s1">&#39;/javascripts/twitter.js&#39;</span><span class="p">,</span> <span class="s1">&#39;recentTweets&#39;</span><span class="p">);</span>
</span><span class='line'>      <span class="p">}</span>
</span><span class='line'>      <span class="k">if</span> <span class="p">(</span><span class="nx">w</span><span class="p">.</span><span class="nx">addEventListener</span><span class="p">)</span> <span class="p">{</span> <span class="nx">w</span><span class="p">.</span><span class="nx">addEventListener</span><span class="p">(</span><span class="s2">&quot;load&quot;</span><span class="p">,</span> <span class="nx">go</span><span class="p">,</span> <span class="kc">false</span><span class="p">);</span> <span class="p">}</span>
</span><span class='line'>      <span class="k">else</span> <span class="k">if</span> <span class="p">(</span><span class="nx">w</span><span class="p">.</span><span class="nx">attachEvent</span><span class="p">)</span> <span class="p">{</span> <span class="nx">w</span><span class="p">.</span><span class="nx">attachEvent</span><span class="p">(</span><span class="s2">&quot;onload&quot;</span><span class="p">,</span><span class="nx">go</span><span class="p">);</span> <span class="p">}</span>
</span><span class='line'>    <span class="p">}(</span><span class="nb">window</span><span class="p">,</span> <span class="nb">document</span><span class="p">,</span> <span class="s1">&#39;script&#39;</span><span class="p">));</span>
</span><span class='line'><span class="nt">&lt;/script&gt;</span>
</span></code></pre></td></tr></table></div></figure>


<p>3) disqus.html</p>

<figure class='code'><figcaption><span></span></figcaption><div class="highlight"><table><tr><td class="gutter"><pre class="line-numbers"><span class='line-number'>1</span>
<span class='line-number'>2</span>
<span class='line-number'>3</span>
<span class='line-number'>4</span>
<span class='line-number'>5</span>
<span class='line-number'>6</span>
<span class='line-number'>7</span>
<span class='line-number'>8</span>
<span class='line-number'>9</span>
<span class='line-number'>10</span>
<span class='line-number'>11</span>
<span class='line-number'>12</span>
<span class='line-number'>13</span>
<span class='line-number'>14</span>
<span class='line-number'>15</span>
<span class='line-number'>16</span>
<span class='line-number'>17</span>
<span class='line-number'>18</span>
<span class='line-number'>19</span>
<span class='line-number'>20</span>
<span class='line-number'>21</span>
<span class='line-number'>22</span>
<span class='line-number'>23</span>
<span class='line-number'>24</span>
</pre></td><td class='code'><pre><code class='html'><span class='line'><span class="nt">&lt;script </span><span class="na">type=</span><span class="s">&quot;text/javascript&quot;</span><span class="nt">&gt;</span>
</span><span class='line'>  <span class="kd">var</span> <span class="nx">disqus_shortname</span> <span class="o">=</span> <span class="s1">&#39;{ { site.disqus_short_name }}&#39;</span><span class="p">;</span>
</span><span class='line'>  <span class="p">{</span> <span class="o">%</span> <span class="k">if</span> <span class="nx">page</span><span class="p">.</span><span class="nx">comments</span> <span class="o">==</span> <span class="kc">true</span> <span class="o">%</span><span class="p">}</span>    
</span><span class='line'>      <span class="c1">// var disqus_developer = 1;</span>
</span><span class='line'>      <span class="kd">var</span> <span class="nx">disqus_identifier</span> <span class="o">=</span> <span class="s1">&#39;{ { site.url }}{ { page.url }}&#39;</span><span class="p">;</span>
</span><span class='line'>      <span class="kd">var</span> <span class="nx">disqus_url</span> <span class="o">=</span> <span class="s1">&#39;{ { site.url }}{ { page.url }}&#39;</span><span class="p">;</span>
</span><span class='line'>      <span class="kd">var</span> <span class="nx">disqus_script</span> <span class="o">=</span> <span class="s1">&#39;embed.js&#39;</span><span class="p">;</span>
</span><span class='line'>  <span class="p">{</span> <span class="o">%</span> <span class="k">else</span> <span class="o">%</span><span class="p">}</span>
</span><span class='line'>      <span class="kd">var</span> <span class="nx">disqus_script</span> <span class="o">=</span> <span class="s1">&#39;count.js&#39;</span><span class="p">;</span>
</span><span class='line'>  <span class="p">{</span> <span class="o">%</span> <span class="nx">endif</span> <span class="o">%</span><span class="p">}</span>
</span><span class='line'>
</span><span class='line'>  <span class="p">(</span><span class="kd">function</span><span class="p">(</span><span class="nx">w</span><span class="p">,</span> <span class="nx">d</span><span class="p">,</span> <span class="nx">s</span><span class="p">)</span> <span class="p">{</span>
</span><span class='line'>      <span class="kd">function</span> <span class="nx">go</span><span class="p">(){</span>
</span><span class='line'>      <span class="kd">var</span> <span class="nx">js</span><span class="p">,</span> <span class="nx">fjs</span> <span class="o">=</span> <span class="nx">d</span><span class="p">.</span><span class="nx">getElementsByTagName</span><span class="p">(</span><span class="nx">s</span><span class="p">)[</span><span class="mi">0</span><span class="p">],</span> <span class="nx">load</span> <span class="o">=</span> <span class="kd">function</span><span class="p">(</span><span class="nx">url</span><span class="p">,</span> <span class="nx">id</span><span class="p">)</span> <span class="p">{</span>
</span><span class='line'>      <span class="k">if</span> <span class="p">(</span><span class="nx">d</span><span class="p">.</span><span class="nx">getElementById</span><span class="p">(</span><span class="nx">id</span><span class="p">))</span> <span class="p">{</span><span class="k">return</span><span class="p">;}</span>
</span><span class='line'>          <span class="nx">js</span> <span class="o">=</span> <span class="nx">d</span><span class="p">.</span><span class="nx">createElement</span><span class="p">(</span><span class="nx">s</span><span class="p">);</span> <span class="nx">js</span><span class="p">.</span><span class="nx">src</span> <span class="o">=</span> <span class="nx">url</span><span class="p">;</span> <span class="nx">js</span><span class="p">.</span><span class="nx">id</span> <span class="o">=</span> <span class="nx">id</span><span class="p">;</span> <span class="nx">js</span><span class="p">.</span><span class="nx">async</span> <span class="o">=</span> <span class="kc">true</span><span class="p">;</span>
</span><span class='line'>          <span class="nx">fjs</span><span class="p">.</span><span class="nx">parentNode</span><span class="p">.</span><span class="nx">insertBefore</span><span class="p">(</span><span class="nx">js</span><span class="p">,</span> <span class="nx">fjs</span><span class="p">);</span>
</span><span class='line'>      <span class="p">};</span>
</span><span class='line'>      <span class="nx">load</span><span class="p">(</span><span class="s1">&#39;http://&#39;</span> <span class="o">+</span> <span class="nx">disqus_shortname</span> <span class="o">+</span> <span class="s1">&#39;.disqus.com/&#39;</span> <span class="o">+</span> <span class="nx">disqus_script</span><span class="p">,</span> <span class="s1">&#39;discuss&#39;</span><span class="p">);</span>
</span><span class='line'>      <span class="p">}</span>
</span><span class='line'>  <span class="k">if</span> <span class="p">(</span><span class="nx">w</span><span class="p">.</span><span class="nx">addEventListener</span><span class="p">)</span> <span class="p">{</span> <span class="nx">w</span><span class="p">.</span><span class="nx">addEventListener</span><span class="p">(</span><span class="s2">&quot;load&quot;</span><span class="p">,</span> <span class="nx">go</span><span class="p">,</span> <span class="kc">false</span><span class="p">);</span> <span class="p">}</span>
</span><span class='line'>  <span class="k">else</span> <span class="k">if</span> <span class="p">(</span><span class="nx">w</span><span class="p">.</span><span class="nx">attachEvent</span><span class="p">)</span> <span class="p">{</span> <span class="nx">w</span><span class="p">.</span><span class="nx">attachEvent</span><span class="p">(</span><span class="s2">&quot;onload&quot;</span><span class="p">,</span><span class="nx">go</span><span class="p">);</span> <span class="p">}</span>
</span><span class='line'>  <span class="p">}(</span><span class="nb">window</span><span class="p">,</span> <span class="nb">document</span><span class="p">,</span> <span class="s1">&#39;script&#39;</span><span class="p">));</span>
</span><span class='line'><span class="nt">&lt;/script&gt;</span>
</span></code></pre></td></tr></table></div></figure>


<p>You can download all files from <a href="http://demos.decodize.com/octopress/Octopress_optimised_social_networ_files.zip">here</a> and can replace your existing octopress files for better performance.</p>

<h3>Summary</h3>

<p>I&rsquo;m really satisfied with octopress till now.</p>
]]></content>
  </entry>
  
  <entry>
    <title type="html"><![CDATA[Site Preloading Methods]]></title>
    <link href="http://praveenvijayan.github.io/blog/2012/11/30/site-preloading-methods/"/>
    <updated>2012-11-30T02:52:00+05:30</updated>
    <id>http://praveenvijayan.github.io/blog/2012/11/30/site-preloading-methods</id>
    <content type="html"><![CDATA[<p>It is a quick post about site preloading. In one of my recent project there was a requirement for site preloading effect. When I googled I got some jQuery plugin. But some of them are bit heavy and loads the resources twice. I have used <a href="http://www.gayadesign.com/diy/queryloader2-preload-your-images-with-ease/">QueryLoader2</a>. But I noticed increase in page load because of images are loading twice.</p>

<p>1.Using queryloader2 jquery plugin (Size 4.42 MB)</p>

<p><img src="//lh3.googleusercontent.com/-Rw0hpxt70co/ULeX80ncW3I/AAAAAAAAE6g/kIDj6u1zdyI/s640/query-loader1.jpg" alt="Using queryloader2 jquery plugin" /></p>

<!-- more -->


<p>2.Normal page loading (Size 2.25 MB)</p>

<p><img src="//lh5.googleusercontent.com/-kEVQjUhZpUQ/ULeX9GwdAbI/AAAAAAAAE6k/lqqa5odlLHo/s640/query-loader2.jpg" alt="Normal page loading" /></p>

<p>The images are requested by the parser and same resource is again requested by the script engine. Following methods can be used to create preloading effect.</p>

<h3>Simple preloader</h3>

<p><strong><em>HTML</em></strong></p>

<pre><code>&lt;body&gt;
    &lt;!-- Your HTML Code here --&gt;
    &lt;div id="loader"&gt;&lt;/div&gt;
&lt;/body&gt;
</code></pre>

<p><strong><em>CSS</em></strong></p>

<pre><code>#loader{
    position:fixed;
    top:0;
    left:0;
    bottom:0;
    right:0;
    background:#fff url(../images/preloader.gif) 50%;
}
</code></pre>

<p><strong><em>JS</em></strong></p>

<pre><code>window.load = function(){ 
    var loader = document.getElementById('loader'); 
    loader.style.display = 'none';
}
</code></pre>

<h3>Percentage preloader</h3>

<p><strong><em>HTML</em></strong></p>

<pre><code>&lt;script src="//cdnjs.cloudflare.com/ajax/libs/jquery/1.8.0/jquery.min.js"&gt;
&lt;script src="preloader.js"&gt;
</code></pre>

<p><strong><em>CSS</em></strong></p>

<pre><code>#loaderMask{
    text-align: center;
    padding-top: 20%;
}
#loaderMask span{
    font-size: 5em;

}
</code></pre>

<p><strong><em>JS – preloader.js</em></strong></p>

<pre><code>$(document).ready(function () {
    "use strict"
    //indexOf support for IE8 and below. 
    if (!Array.prototype.indexOf){
      Array.prototype.indexOf = function(elt /*, from*/){
        var len = this.length &gt;&gt;&gt; 0;

        var from = Number(arguments[1]) || 0;
        from = (from &lt; 0)
             ? Math.ceil(from)
             : Math.floor(from);
        if (from &lt; 0)
          from += len;

        for (; from &lt; len; from++){
          if (from in this &amp;&amp;
              this[from] === elt)
            return from;
        }
        return -1;
      };
    }

    //bgImg for holding background images in the page &amp; img array for images present in the document(&lt;img src=""&gt;).
    var bgImg = [], img = [], count=0, percentage = 0;

    //Creating loader holder. 
    $('&lt;div id="loaderMask"&gt;&lt;span&gt;0%&lt;/span&gt;&lt;/div&gt;').css({
        position:"fixed",
        top:0,
        bottom:0,
        left:0,
        right:0,
        background:'#fff'
    }).appendTo('body');

    //Using jQuery filter method we parse all elemnts in the page and adds background image url &amp; images src into respective arrays.
    $('*').filter(function() {

        var val = $(this).css('background-image').replace(/url\(/g,'').replace(/\)/,'').replace(/"/g,'');
        var imgVal = $(this).not('script').attr('src');

        //Getting urls of background images.
        if(val !== 'none' &amp;&amp; !/linear-gradient/g.test(val) &amp;&amp; bgImg.indexOf(val) === -1){
            bgImg.push(val)
        }

        //Getting src of images in the document.
        if(imgVal !== undefined &amp;&amp; img.indexOf(imgVal) === -1){
            img.push(imgVal)
        }

    });

    //Merging both bg image array &amp; img src array
    var imgArray = bgImg.concat(img); 

    //Adding events for all the images in the array.
    $.each(imgArray, function(i,val){ 
        //Attaching load event 
        $("&lt;img /&gt;").attr("src", val).bind("load", function () {
            completeImageLoading();
        });

        //Attaching error event
        $("&lt;img /&gt;").attr("src", val).bind("error", function () {
            imgError(this);
        });
    })

    //After each successful image load we will create percentage.
    function completeImageLoading(){
        count++;
        percentage = Math.floor(count / imgArray.length * 100);
        $('#loaderMask').html('&lt;span&gt;'+percentage + '%'+'&lt;/span&gt;');

        //When percentage is 100 we will remove loader and display page.
        if(percentage === 100){
            $('#loaderMask').html('&lt;span&gt;100%&lt;/span&gt;')
            $('#loaderMask').fadeOut(function(){
                $('#loaderMask').remove()
            })
        }
    }

    //Error handling - When image fails to load we will remove the mask &amp; shows the page. 
    function imgError (arg) {
        $('#loaderMask').html("Image failed to load.. Loader quitting..").delay(3000).fadeOut(1000, function(){
            $('#loaderMask').remove();
        })
    }

});
</code></pre>

<p><strong><em>Demo</em></strong>
<a href="http://demos.decodize.com/preloader/">Site preloader demo</a></p>

<p><strong><em>Download</em></strong>
<a href="http://demos.decodize.com/preloader/Site_preloader.zip">Site preloader source</a></p>
]]></content>
  </entry>
  
  <entry>
    <title type="html"><![CDATA[PIXI : Tool to Create a Pixel Perfect Site.]]></title>
    <link href="http://praveenvijayan.github.io/blog/2012/10/23/pixi-tool-create-pixel-perfect-site/"/>
    <updated>2012-10-23T02:41:00+05:30</updated>
    <id>http://praveenvijayan.github.io/blog/2012/10/23/pixi-tool-create-pixel-perfect-site</id>
    <content type="html"><![CDATA[<p>I hate making sites pixel perfect, but some times its very important to match the site exactly with design. Earlier I have used tool like Pixel perfect – a Firefox Addon &amp; also tried some JavaScript implimentations. Recent versions of FF is not supporting pixel perfect Addon. I filed to find anything that can serve my purpose. PIXI is small js &amp; css file. When you activate PIXI you will get an overlay &amp; you can drag n drop design mockup into it. You can adjust opacity, position and z-index.</p>

<!-- more -->


<p><a href="http://praveenvijayan.github.com/PIXI/code/">PIXI Demo</a> <br>
<a href="http://praveenvijayan.github.com/PIXI/">PIXI Page</a> <br>
<a href="https://github.com/praveenvijayan/PIXI/zipball/master">PIXI Download</a> <br></p>

<iframe class="iframe-git-button" src="http://ghbtns.com/github-btn.html?user=praveenvijayan&#038;repo=PIXI&#038;type=fork&#038;size=large" allowtransparency="true" frameborder="0" scrolling="0" width="83px" height="30px"></iframe>


<p><img src="//lh3.googleusercontent.com/-Fbp6bxmgK14/UIWlG5oevvI/AAAAAAAAEqk/Z0K0iY5iCg4/s1152/PIXI-template.jpg" alt="PIXI" /></p>

<p>Note: Demonstrated template is not mine.</p>

<h3>Install</h3>

<p>Include pixi.js, pixi.css and jQuery in your site.</p>

<pre><code>&lt;link rel="stylesheet" href="http://praveenvijayan.github.com/PIXI/code/pixi.min.css"&gt;

&lt;script src="http://ajax.aspnetcdn.com/ajax/jQuery/jquery-1.8.2.min.js"&gt;&lt;/script&gt;
&lt;script src="http://praveenvijayan.github.com/PIXI/code/pixi.min.js"&gt;&lt;/script&gt;
</code></pre>

<h3>Usage</h3>

<p>Press <kbd>G</kbd> to activate the overlay.
Drag n Drop design mockup/template into the overlay.</p>

<p><img src="//lh6.googleusercontent.com/-Xppj0w92FYI/UIWlGk1eNtI/AAAAAAAAEqg/FEFuiuUOZv0/s1152/PIXI-overlay-drag.jpg" alt="PIXI" /></p>

<p>Press <kbd>shift + &mouse; </kbd> drag image to adjust.</p>

<p><img src="//lh3.googleusercontent.com/-63vaXnv7cvE/UIWlG9cqnwI/AAAAAAAAEqo/2_d82rr7lC0/s1152/PIXI-overlay.jpg" alt="PIXI" /></p>

<p>Press <kbd>0-9</kbd> to set opacity.</p>

<h3>Shortcuts</h3>

<p><kbd>G</kbd> Toggle overlay.
<kbd>Z</kbd> Bring fornt or sent to back [z-index:0-9999].
<kbd>←</kbd>  Moves overlay image 1px left.
<kbd>→</kbd>  Moves overlay image 1px right.
<kbd>↑</kbd>  Moves overlay image 1px up.
<kbd>↓</kbd>  Moves overlay image 1px down.
<kbd>shift  + Drag</kbd> Moves overlay image.
<kbd>0  – 9</kbd> Sets overlay opacity.
<kbd>P</kbd>  – Disables overlay’s pointer event. When pointer event is none, you can’t drag n drop images. Activate it (press ‘P’) when you want to inspect underlaing elements.</p>

<h3>Browser support</h3>

<p>PIXI uses HTML5 DnD, File API &amp; Local storage to do things. It won’t work in IE. Tested in chrome &amp; Firefox.</p>
]]></content>
  </entry>
  
  <entry>
    <title type="html"><![CDATA[Sublime Text 2 Bidirectional Language Support – Plugin]]></title>
    <link href="http://praveenvijayan.github.io/blog/2012/10/06/sublime-text-2-bidirectional-language-support-plugin/"/>
    <updated>2012-10-06T02:26:00+05:30</updated>
    <id>http://praveenvijayan.github.io/blog/2012/10/06/sublime-text-2-bidirectional-language-support-plugin</id>
    <content type="html"><![CDATA[<pre><code>Updates
10th Oct 2012 :
Fixed Arabic broken text (letters are not joining) &amp; post updated.
</code></pre>

<p>Sublime text 2 has so many brilliant features that saves time &amp; effort. Sublime text 2 supports UTF-8, but right now it lacks capability to handle bidirectional languages like Arabic, Hebrew etc… Sublime BiDi Plugin will enable this shortcoming. Sublimes’s future version may support Right-To-Left Languages. Developers from MENA region will love this feature.</p>

<p><strong><em>Mac</em></strong>
<img src="//lh6.googleusercontent.com/-_7fFwpg8GDk/UHJQd148ldI/AAAAAAAAEn8/hGeM1hzrt7g/s1024/sublime-text2-rtl.png" alt="Sublime text 2" /></p>

<!-- more -->


<p><strong><em>Windows</em></strong>
<img src="//lh6.googleusercontent.com/-GAIfpn6Oeyg/UHHVmqjSG7I/AAAAAAAAEng/wWPjpxu5e5I/s799/sublime-text2-arabic.jpg" alt="Sublime text 2" /></p>

<h2>Installation</h2>

<ol>
<li><p>Clone it from github to your package directory.</p>

<p> <a href="https://github.com/praveenvijayan/Sublime-Text-2-BIDI">https://github.com/praveenvijayan/Sublime-Text-2-BIDI</a></p></li>
</ol>


<p><strong><em>Mac</em></strong></p>

<p><img src="//lh6.googleusercontent.com/-NR9vBLSQ9CQ/UHJQjVSy29I/AAAAAAAAEoE/pbkmHUWVl18/s720/Screen%2520Shot%25202012-10-08%2520at%25208.24.05%2520AM.png" alt="Sublime text 2 BiDi Plugin" /></p>

<p><strong><em>Windows</em></strong></p>

<p><img src="//lh6.googleusercontent.com/-zm8xnRDkluI/UG9mLrQYgPI/AAAAAAAAEm0/8qOUUMngOlw/s800/rtl-sublime-text.jpg" alt="Sublime text 2 BiDi Plugin" /></p>

<p>Change your font in sublime user settings [Windows]</p>

<p><img src="//lh3.googleusercontent.com/-l_CN_p6kJKM/UHHVlhvTU5I/AAAAAAAAEnY/8fLi3mbYoUU/s412/sublime-text2-user-pref-menu.jpg" alt="Sublime text 2 BiDi Plugin" /></p>

<p>Set it to Arial or any other font that supports Arabic.</p>

<p><img src="//lh6.googleusercontent.com/-VM_A9JCJhT0/UHHVlFSsMNI/AAAAAAAAEnU/CXvpyMjdv2U/s516/sublime-text2-user-pref.jpg" alt="Sublime text 2" /></p>

<h3>Usage</h3>

<ul>
<li>Open document</li>
<li>Press Ctrl+b or Tools > Bidirectional text</li>
</ul>


<p><img src="//lh6.googleusercontent.com/-o8kkAWZDmcw/UG9lAk9omKI/AAAAAAAAEmk/u__PYos0-IY/s800/bidi-sublime-text2.jpg" alt="Sublime text 2" /></p>

<h3>Notes</h3>

<p>This plugin is in its early stage. I don’t know Arabic. I have tested using pattern matching.</p>

<h3>Issues</h3>

<p>Please post issues here : <a href="https://github.com/praveenvijayan/Sublime-Text-2-BIDI/issues">Sublime BiDi issues</a></p>

<h3>Contribute</h3>

<iframe class="iframe-git-button" src="http://ghbtns.com/github-btn.html?user=praveenvijayan&#038;repo=Sublime-Text-2-BIDI&#038;type=fork&#038;size=large" allowtransparency="true" frameborder="0" scrolling="0" width="83px" height="30px"></iframe>


<iframe class="iframe-git-button" src="http://ghbtns.com/github-btn.html?user=praveenvijayan&#038;repo=Sublime-Text-2-BIDI&#038;type=follow&#038;size=large" allowtransparency="true" frameborder="0" scrolling="0" width="225px" height="30px"></iframe>


<h3>Thanks</h3>

<p><a href="https://github.com/MeirKriheli/python-bidi">https://github.com/MeirKriheli/python-bidi</a> <br>
<a href="https://github.com/mpcabd/python-arabic-reshaper">https://github.com/mpcabd/python-arabic-reshaper.</a></p>
]]></content>
  </entry>
  
  <entry>
    <title type="html"><![CDATA[Installing Yeoman Front-end Development Stack in Windows]]></title>
    <link href="http://praveenvijayan.github.io/blog/2012/09/13/installing-yeoman-front-end-development-stack-windows/"/>
    <updated>2012-09-13T01:46:00+05:30</updated>
    <id>http://praveenvijayan.github.io/blog/2012/09/13/installing-yeoman-front-end-development-stack-windows</id>
    <content type="html"><![CDATA[<pre><code>Updates
14th Sep 2012 :
1. Alternate method to install Yeoman using Chocolatey.
2. Github Yeoman windows issues link.

15th Sep 2012 :
1. Added description (Chocolatey method).

17th Feb 2013 :
1. On Feb 15th 2013 Yeoman 1.0 BETA released. Its not supported on windows yet. 

3rd March 2013 :
1. Yeoman 1.0 Beta can be installed on windows.
</code></pre>

<p>This post is for Yeoman 0.9 and a new beta version, Yeoman 1.0 Beta is available and installation instructions can be found here <a href="http://decodize.com/html/getting-started-with-yeoman-1-dot-0-beta-on-windows/">Yeoman 1.0 Beta installation on windows</a></p>

<h2>What is Yeoman?</h2>

<p><img src="//lh3.googleusercontent.com/-myRXm2caL_w/UFGha2n2IMI/AAAAAAAAEeA/NuBd3P0YJ0Y/s700/Yeoman.png" title="Yeoman" alt="Yeoman" /></p>

<p>Its a tool to make the front-end development workflow easier. It includes tools and front-end frameworks that helps to create web apps quickly and easily.</p>

<h2>Features</h2>

<p>Initialize and scaffold a new project<br>
Build &amp; deploy app<br>
Launch server, preview &amp; live reload<br>
Run automated tests using PhantomJS<br>
Install &amp; update packages<br>
Customise your apps framwork<br>
Genarator for chrome app<br></p>

<!-- more -->


<p>More on <a href="http://yeoman.io/">Yeoman</a></p>

<h2>Installation</h2>

<p><strong><em>MAC OSX &amp; Linux Installations</em></strong>
<a href="http://yeoman.io/gettingstarted.html">Yeoman site</a></p>

<h3>Install Yeoman using Chocolatey (Method 1)</h3>

<p>Chocolatey is a package manager for windows. Its like Linux <a href="http://www.apt-get.org/">apt-get</a>. Once Chocolatey installed, you can install <a href="http://chocolatey.org/packages">Chocolatey packages</a> from windows cmd. Install Chocolatey &amp; type <code>cinst yeoman</code> it will prompt you to install all necessary tools one by one.</p>

<p><strong><em>Steps</em></strong></p>

<ol>
<li><p>Goto <a href="http://chocolatey.org/">chocolatey.org</a>
Chocolatey NuGet is a Machine Package Manager, somewhat like apt-get, but built with windows in mind.</p></li>
<li><p>Open cmd &amp; paste</p>

<p> <code>C:> @powershell -NoProfile -ExecutionPolicy unrestricted -Command &ldquo;iex ((new-object net.webclient).DownloadString(&lsquo;<a href="http://bit.ly/psChocInstall">http://bit.ly/psChocInstall</a>&rsquo;))&rdquo; &amp;&amp; SET PATH=%PATH%;%systemdrive%\chocolatey\bin</code></p></li>
<li><p>Type</p>

<p> <code>c:> cinst yeoman</code></p></li>
</ol>


<p>It will fetch &amp; install all dependent files.</p>

<p>Done!!</p>

<p>Yeoman installed on windows and now its time to play with yeoman commands. Close and reopen cmd.</p>

<p><code>C:> yeoman init &ndash;disable-insight</code></p>

<p>This will create bolierplate for your next application. To launch preview server and run application locally use <code>yeoman server --disable-insight</code>.</p>

<p><a href="#workingwithyeoman">more commands</a></p>

<h3>Windows (Method 2)</h3>

<p><strong><em>Prerequisites</em></strong></p>

<p><img src="//lh4.googleusercontent.com/-xoaNrBJVhb4/UFGhI1Yb-DI/AAAAAAAAEd4/H8jmtEmtWX0/h101/logo.png" alt="Ruby Installer" /></p>

<p>This is a self-contained Windows-based installer that includes the Ruby language, an execution environment, important documentation, and more.</p>

<p><a href="http://rubyinstaller.org/downloads/">Download &amp; install</a></p>

<p><img src="//lh5.googleusercontent.com/-D142mVO-EyY/UFGnTiAV55I/AAAAAAAAEfA/Dx2ozFXEWPg/h77/Compass.png" alt="Compass" /></p>

<p>Compass is an open-source CSS Authoring Framework.</p>

<p><a href="http://compass-style.org/install/">Download &amp; install</a></p>

<p><img src="//lh5.googleusercontent.com/-yezu0Kt1GQY/UFGUx47AG3I/AAAAAAAAEdc/Mwzq6Xh1o2I/h96/logo.png" alt="Nodejs" /></p>

<p>Node.js is a platform built on Chrome’s JavaScript runtime for easily building fast, scalable network applications. Node.js uses an event-driven, non-blocking I/O model that makes it lightweight and efficient, perfect for data-intensive real-time applications that run across distributed devices.</p>

<p><a href="http://nodejs.org/download/">Download &amp; install</a></p>

<p><img src="//lh4.googleusercontent.com/-KCyI1MyDOHA/UFGoOQBtHKI/AAAAAAAAEfM/Cc-tabJ1rhw/h120/Git.png" alt="Git" /></p>

<p>Git is a free and open source distributed version control system</p>

<p><a href="http://git-scm.com/">Download &amp; install</a></p>

<p><img src="//lh4.googleusercontent.com/-eRZHYGs6OW0/UFHn-7pfyLI/AAAAAAAAEg8/cU3--xx6b38/h120/phantomjs.png" alt="Phantomjs" /></p>

<p>PhantomJS is a headless WebKit with JavaScript API.</p>

<p><a href="http://phantomjs.org/download.html">Download &amp; Install</a>  – You have to add path in <a href="//lh6.googleusercontent.com/-iX-vxgYN8TA/UFHn-t4iB1I/AAAAAAAAEhA/DyqsFfxREP0/s483/phantomjs-path.png">Windows Environment Variable</a>.</p>

<p><img src="//lh5.googleusercontent.com/-Y8JiSvnxVCA/UFGoq4UoShI/AAAAAAAAEfU/MT8lHS4x9ww/s128/github-windows.png" alt="Git windows" /></p>

<p>The easiest way to use Git on Windows. [Optional]</p>

<p><a href="http://windows.github.com/">Download &amp; install</a></p>

<p><img src="http://www.python.org/images/python-logo.gif" alt="Python" /></p>

<p>Python is a programming language that lets you work more quickly and integrate your systems more effectively.</p>

<p><a href="http://www.python.org/download/">Download &amp; install</a></p>

<p><strong><em>Steps</em></strong></p>

<p>1.Download and install all above tools</p>

<p>There are 2 method to install Yeoman.<br/>
——a. Open command prompt &amp; type <code>C:\npm install yeoman</code><br/>
——b. You can install using Git</p>

<p>Clone Yeoman using git.</p>

<p><img src="//lh5.googleusercontent.com/-gddq-GA3znE/UFGuEzDYy_I/AAAAAAAAEfw/eoQiF-cUTOM/s573/clone-yeoman.png" alt="Git Yeoman" /></p>

<p>&ndash;Or&ndash;</p>

<p>If you have installed  Github for windows tool. “Clone in windows” from Github Yeoman page.</p>

<p><img src="//lh3.googleusercontent.com/-2ArR_EW7eJE/UFGjrlAT_AI/AAAAAAAAEeI/Wt1KPSGi3AI/s499/github.jpg" alt="Git Windows app" /></p>

<p>Clicking on “Clone in Windows” will open up windows github tool.</p>

<p><img src="//lh3.googleusercontent.com/-JC2F7-gm5IA/UFGkWaoooKI/AAAAAAAAEf4/4LhO6MhJv78/s728/yeoman.jpg" alt="Git Windows app" /></p>

<p>After cloning right click and open files in explorer.</p>

<p><img src="//lh4.googleusercontent.com/-Pg97eRwiXJk/UFGkXLTeaCI/AAAAAAAAEeU/o6juq4Tcw1w/s470/yeoman-file.jpg" alt="Yeoman CLI" /></p>

<p>shift + right click inside the root folder. You will get an option “Open Command Window Here”.</p>

<pre><code>npm install -g
</code></pre>

<p>You will get following screen if its a success.</p>

<p><img src="//lh5.googleusercontent.com/-NSp0fAUcv2E/UFGUlSPGL6I/AAAAAAAAEdU/Y_ZOc_L0zqg/s677/yeoman-cmd.jpg" alt="Yeoman installation" /></p>

<p>Done!!
<a href="#" id="workingwithyeoman"></a></p>

<h3>Working with Yeoman</h3>

<pre><code>yeoman init
</code></pre>

<p><img src="//lh4.googleusercontent.com/-yTQAGVESviU/UFGVgz57ZrI/AAAAAAAAEdk/JNF3pcmFTgc/s677/yeoman-init.jpg" alt="Yeoman init" /></p>

<p><img src="//lh4.googleusercontent.com/-mpa2LuQhyzU/UFG6jVL5GjI/AAAAAAAAEgk/TDlSWMZtClA/s800/yeoman-server.png" alt="Yeoman server" /></p>

<pre><code>yeoman init      # Initialize and scaffold a new project using generator templates
yeoman build     # Build an optimized version of your app, ready to deploy
yeoman server    # Launch a preview server which will begin watching for changes
yeoman test      # Run a Mocha test harness in a headless PhantomJS

yeoman install   # Install a package from the client-side package registry
yeoman uninstall # Uninstall the package
yeoman update    # Update a package to the latest version
yeoman list      # List the packages currently installed
yeoman search    # Query the registry for matching package names
yeoman lookup    # Look up info on a particular package
</code></pre>

<p><a href="http://yeoman.io/commandline.html">more commands and help</a></p>

<h2>Github Yeoman Windows issue</h2>

<p>File bugs &amp; issues here <a href="https://github.com/yeoman/yeoman/issues/216">github yeoman windows issue</a></p>

<h2>Summary</h2>

<p>Its a super cool tool that helps to streamline front-end workflow.</p>

<h2>Resources</h2>

<p><a href="http://yeoman.io/">Yeoman home page</a> <br>
<a href="https://github.com/yeoman/yeoman/">Yeoman Github page</a> <br>
<a href="https://github.com/yeoman/yeoman/issues">Yeoman issues</a> <br>
<a href="https://github.com/mklabs/yeoman/wiki/_pages">Yeoman documentation</a></p>
]]></content>
  </entry>
  
  <entry>
    <title type="html"><![CDATA[JavaScript Memoization – Caching Results for Better Performance.]]></title>
    <link href="http://praveenvijayan.github.io/blog/2012/08/27/javascript-memoization-caching-results-for-better-performance/"/>
    <updated>2012-08-27T01:35:00+05:30</updated>
    <id>http://praveenvijayan.github.io/blog/2012/08/27/javascript-memoization-caching-results-for-better-performance</id>
    <content type="html"><![CDATA[<h2>Introduction</h2>

<p>Memoization is a technique used to cache result of a previously calculated value thus can avoid the need to recalculate.</p>

<p>Simplest example.</p>

<pre><code>function square(num){
    return num*num;
}

square(10) //100
</code></pre>

<p>Each time when we call square(), value will re-calculate. Caching result is importent when we do CPU intensive tasks.</p>

<p>Re-writing above code using cache</p>

<!-- more -->


<h3>Method 1</h3>

<pre><code>function square(num){
  var result = '';
  if(!square.cache[num]){ 
     console.log("Computing value...");
     result = num*num;
     square.cache[num] = result;  
  }

  return square.cache[num];

}

square.cache = {}

square(10) //First time when we call this function. It calculates the value &amp;amp; cache it.
square(10) // Second time onwards it return the result from cache.
square(20) // square function will calculate again if its a new value.
</code></pre>

<p><img src="//lh5.googleusercontent.com/-cgSoKZkhTP8/UDqBhExqEJI/AAAAAAAAEWI/AbmfwJR7drM/s512/Screen%2520Shot%25202012-08-27%2520at%252012.39.49%2520AM.png" alt="Javascript Memoization" /></p>

<h3>Method 2 Using hasOwnProperty</h3>

<p>This method is useful when there are multiple arguments.</p>

<pre><code>var square = function(num){

            var key = Array.prototype.slice.call(num).join(""); 
            // This won’t work if argument send as Object. Eg:-  newFun({name:”my name”, age:20});

    if(!square.cache[key]){
        var result={};

                result = num *num;
        //Computation
          console.log("Computing value...");      
    square.cache[key] = result;
}

return square.cache[key];
}

square.cache = {};
</code></pre>

<h3>Method 3 Using JSON.stringify, Array.join or argument.callee.</h3>

<p>This method is useful when there are multiple arguments.</p>

<pre><code>var square = function(num){

            var key = Array.prototype.slice.call(num).join(""); 
            // This won’t work if argument send as Object. Eg:-  newFun({name:”my name”, age:20});

    if(!square.cache[key]){
        var result={};

                result = num *num;
        //Computation
          console.log("Computing value...");      
    square.cache[key] = result;
}

return square.cache[key];
}

square.cache = {};
</code></pre>

<p>&mdash;-or&mdash;-</p>

<pre><code>var square = function(num){
    var key = JSON.stringify(Array.prototype.slice.call(num));

    if(!square.cache[key]){
    var result={};
    //Computation
        console.log("Computing value..."); 
        result = num*num;
    square.cache[key] = result;
}

return square.cache[key];
}

square.cache = {};
</code></pre>

<p>&mdash;or&mdash;-</p>

<pre><code>var  square = function(num){
    var thisFunc = arguments.callee, result;
           if(!thisFunc.cache[num]){
                   result = {}
                   //Computation
                   console.log("Computing value..."); 
                   result = num*num;
                   thisFunc.cache[num] = result;
           }
return thisFunc.cache[num];
}

square.cache = {}
</code></pre>

<p>Above method is not recommended since arguments.callee should be avoid and ECMAScript forbids use of arguments.callee() in strict mode.</p>

<h3>Method 4</h3>

<p>This will create a higher-order function called memoize() that accepts function and return a memoized version of it.</p>

<pre><code>function memoize(f){
                var cache = {};

                return function(){

                    var key = JSON.stringify(Array.prototype.slice.call(arguments));

                    if(key in cache){
                        console.log('From cache...')
                        return cache[key]
                    }else{
                        console.log('Computing..')
                        return cache[key] = f.apply(this,arguments);
                    }

                }

            }

//Usage

var squareMem = memoize(square)
squareMem(10);//100
</code></pre>

<p><img src="//lh4.googleusercontent.com/-Vl_3-kx6pRc/UDqBfFrRCqI/AAAAAAAAEV8/dcvtEihpM08/s512/Screen%2520Shot%25202012-08-27%2520at%25201.18.22%2520AM.png" alt="JavaScript Memoization" /></p>

<p>&mdash;Or&mdash;</p>

<pre><code>Function.prototype.memoiz = function(){

               var cache = {}, self = this;

               return function(arg){

                   var key = JSON.stringify(Array.prototype.slice.call(arguments));

                   if(key in cache){
                        console.log('From cache...')
                        return cache[key]
                    }else{
                        console.log('Computing..')
                        return cache[key] = self(arg);
                    }

               }

            }

//Usage
var squareMem = square.memoiz()
squareMem(10); 
squareMem(20);
squareMem(30);
squareMem(40);
squareMem(50);
</code></pre>

<p><img src="//lh6.googleusercontent.com/-OTRcR6v1NuA/UDqBflwl-hI/AAAAAAAAEWA/xzuGB97mrek/s512/Screen%2520Shot%25202012-08-27%2520at%25201.20.38%2520AM.png" alt="JavaScript Memoization" /></p>

<p>Under Closure section you can find all the cached results</p>

<p><img src="//lh5.googleusercontent.com/-N2SfLU7PSW8/UDqBf5yr77I/AAAAAAAAEWE/S3zNNYRPCH8/s640/Screen%2520Shot%25202012-08-27%2520at%25201.34.25%2520AM.png" alt="JavaScript Memoization" /></p>

<p><a href="https://github.com/addyosmani/memoize.js/blob/master/memoize.js">memoiz.js</a> is a memoization library hosted in Github.</p>

<p>References
<a href="http://addyosmani.com/blog/faster-javascript-memoization/">Faster javascript memoization</a>
<a href="http://www.nczonline.net/blog/2009/01/27/speed-up-your-javascript-part-3/">Speed up your JavaScript, Part 3</a>
<a href="http://unscriptable.com/2009/05/01/a-better-javascript-memoizer/">A Better Javascript Memoizer</a></p>
]]></content>
  </entry>
  
  <entry>
    <title type="html"><![CDATA[Mac OSX Shortcuts]]></title>
    <link href="http://praveenvijayan.github.io/blog/2012/08/11/mac-osx-shortcuts/"/>
    <updated>2012-08-11T01:21:00+05:30</updated>
    <id>http://praveenvijayan.github.io/blog/2012/08/11/mac-osx-shortcuts</id>
    <content type="html"><![CDATA[<p>I’m using both windows and mac. Sometimes I missed up with keyboard shortcuts. Both OS has its own plus and minus. Enter/Return key opens a folder in windows but it renames file/folder in mac, in windows double clicking on titlebar maximize window, but same thing minimizes window in mac (you have to enable it from preference > doc – “Double-click a windows titlebar to minimize”).</p>

<h4>Global shortcuts</h4>

<p>Quickly open finder</p>

<pre><code>cmd + opt + spacebar = win + E
</code></pre>

<p><img src="//lh4.googleusercontent.com/-NEHHy_dLllU/UCVXbNfCbGI/AAAAAAAAES0/ddsv_OHrYNg/s720/Searching%2520%25E2%2580%259CThis%2520Mac%25E2%2580%259D-2.jpg" alt="Open Finder" /></p>

<!-- more -->


<p>Close window
    cmd+w = crtl + w</p>

<p>Show desktop
    fn + f11 = win + D</p>

<p>Lock screen
    shift + ctrl + power = win + L</p>

<p>Force quit applications
    cmd+opt+esc = ctrl+shift+esc</p>

<p><img src="//lh6.googleusercontent.com/-ei7AF6UFl9w/UCVW5E8AmyI/AAAAAAAAERQ/ZUsg5uFn9AY/s576/Force%2520Quit%2520Applications.jpg" alt="Force Quit" /></p>

<p>Switch between opened application
    cmd+tab = ctrl+tab / win+tab</p>

<p>Switch between same application window
    cmd + ~</p>

<p>Increase volume or brightness by quarter increment
    shift+option+f12 – volume
    shift+opton+f2 – brightness</p>

<p><img src="//lh4.googleusercontent.com/-SwukWiuyJSs/UCVXHzH396I/AAAAAAAAERw/hpzYPZ-ytKI/s912/Screen%2520Shot%25202012-08-10%2520at%252010.27.58%2520AM.png" alt="Volume" /></p>

<p>Show/Hide – Dock
    opt+cmd+D</p>

<p>Screen capture
    shift + cmd + 3
    shift + cmd + 4</p>

<h4>Finder shortcuts</h4>

<p>Mac automatically refreshes every folder when something modifies [fails sometimes]. One annoying thing when working with finder is icons are not arranging automatically to grid.</p>

<p>There are a few ways to arrange items in finder. Clean up command will snap item to grid. Following key stocks will arrange items in a nice way and these are roughly equal to ‘Refresh’ (F5) in windows.</p>

<pre><code>cmd+opt+1 – clean up by name
cmd+opt+2 - clean up by kind
cmd+opt+5 - clean up by date modified
cmd+opt+6 - clean up by size
cmd+opt+7 - clean up by type
</code></pre>

<p>Tip 1: Drag and release folder while pressing cmd will arrange folder/files to grid.
Tip 2 : Press opt key &amp; right click -> ‘Arrange by’ will change to ‘Sort by’. You can sort using name, kind, size etc..</p>

<p><img src="//lh5.googleusercontent.com/-wfG0sXeGOyg/UCVXPcZusrI/AAAAAAAAESI/RjdwjzaTVSk/s640/Screen%2520Shot%25202012-08-10%2520at%252010.33.59%2520PM.png" alt="Clean up by" /></p>

<p>Go to folder
    cmd+shift+G
network
    cmd + K
using terminal
    open <path>
Parent folder
    cmd + uparrow
open folder
    cmd+down
back
    cmd+[
forward
    cmd+]</p>

<p>Open folder
    cmd + downarrow or cmd+o = enter</p>

<p>Duplicate a file/folder
    cmd+D</p>

<p>Open a folder in terminal from finder.
You can use either Drag n Drop folder into terminal icon or enable service “New terminal at folder” from Preference > keyboard. Right click on any folder and select “New terminal at folder” from the context menu.</p>

<p><img src="//lh3.googleusercontent.com/-BE1lWJlrp04/UC8bALRPrfI/AAAAAAAAEU8/q0VrvYI79aw/s512/Screen%2520Shot%25202012-08-18%2520at%25209.59.20%2520AM.png" alt="Open a folder in terminal from finder" /></p>

<p><img src="//lh6.googleusercontent.com/-LyNVvOKCsw4/UC8a_B1ebkI/AAAAAAAAEU0/GtPDSVVWNz8/s512/Screen%2520Shot%25202012-08-18%2520at%252010.01.07%2520AM.png" alt="Open current folder from terminal to finder" /></p>

<p><code>$ open .</code></p>

<p><img src="//lh3.googleusercontent.com/-PSHfkVtXd0w/UC8cUWZiTuI/AAAAAAAAEVE/HeNKjPfxStg/s1024/Screen%2520Shot%25202012-08-18%2520at%252010.08.20%2520AM.png" alt="Open folder" /></p>

<h4>Hidden screencast tool</h4>

<p>Quicktime has a screen capture tool.</p>

<p><img src="//lh6.googleusercontent.com/-tIFgswYe28E/UCVXKE2EpII/AAAAAAAAER4/XBbuQaeHIbY/s800/Screen%2520Shot%25202012-08-10%2520at%252010.30.41%2520AM.png" alt="Quicktime screencast" /></p>

<h4>Automator tips</h4>

<p><img src="//lh3.googleusercontent.com/--JBFAp3xrWI/UCVdH2oyRRI/AAAAAAAAETs/u2OasUerfrc/s896/HT2488_ottolaunchpad----en.jpeg" alt="Automator Mac" /></p>

<p>Automator is a tool that helps to automate repeated tasks.</p>

<p><img src="//lh4.googleusercontent.com/-4z1LxPJ_h3E/UCVW5-I3-BI/AAAAAAAAERY/t_-EhPloRvk/s640/Automator.jpeg" alt="Automator mac" /></p>

<p><strong><em>Copy file path</em></strong></p>

<p>Some times you need to copy the path of a specified folder or file. You can use automator to copy the path.</p>

<ol>
<li>Open automator</li>
<li>Select services</li>
<li>Change – “service receives selected” to “file or folder” in application to “Finder“.</li>
<li>Type “copy” in the filter section and drag n drop – “Copy to clipboard” to the workflow pane.</li>
<li>Save it as – “Copy file path”.</li>
</ol>


<p><img src="//lh4.googleusercontent.com/-mAwEJ9Z5aHA/UCVXS7ALcoI/AAAAAAAAESY/HAbkiw7ChM0/s1000/Screen%2520Shot%25202012-08-10%2520at%252011.00.44%2520PM.png" alt="Copy file path Automator mac" /></p>

<p>Now you can right click on any folder/file and can copy path. Assign a keyboard shortcut from Preference > keyboard.</p>

<p><strong><em>Change image size</em></strong></p>

<p><img src="https://lh6.googleusercontent.com/-VzUV1wNoj-8/UCVhNu4uXcI/AAAAAAAAEUE/rCaiCKEoVX4/s576/Screen%2520Shot%25202012-08-11%2520at%252012.57.57%2520AM.png" alt="Change image size Automator mac" /></p>

<p><strong><em>Batch renaming files</em></strong></p>

<p><img src="//lh4.googleusercontent.com/-cZ6phyLZdeU/UCVhNfxtthI/AAAAAAAAEUA/HNQO-1ZDZ1o/s576/Screen%2520Shot%25202012-08-11%2520at%252012.57.29%2520AM.png" alt="Batch renaming files Automator" /></p>

<h4>Tools</h4>

<p><strong><em>maximize window</em></strong>
<a href="http://www.macupdate.com/app/mac/30591/right-zoom/">Right zoom</a> is a little free tool that converts mac’s default maximize behavior to maximize window to all available screen space.</p>

<p><strong><em>Quick look plugins</em></strong>
Do a 3 finger tap on any file will reveal a quick view with some basic info. You can extend its capabilities using plugins. Check quick look plugin to find more details.</p>

<p><a href="http://www.quicklookplugins.com/">Quick look plugins</a></p>

<h3>Resources</h3>

<p><a href="http://www.maclife.com/article/features/15_automator_and_applescripts_you_can%E2%80%99t_live_without">15 Automator and AppleScripts You Can’t Live Without</a>
<a href="http://mac.appstorm.net/how-to/applescript/10-awesome-uses-for-automator-explained/">10 Awesome Uses for Automator Explained</a></p>
]]></content>
  </entry>
  
  <entry>
    <title type="html"><![CDATA[OS X Mountain Lion Upgrade &amp; Issues With Old Applications]]></title>
    <link href="http://praveenvijayan.github.io/blog/2012/07/31/os-x-mountain-lion-upgrade-and-issues-with-old-applications/"/>
    <updated>2012-07-31T01:14:00+05:30</updated>
    <id>http://praveenvijayan.github.io/blog/2012/07/31/os-x-mountain-lion-upgrade-and-issues-with-old-applications</id>
    <content type="html"><![CDATA[<p>Today upgraded to OS X Mountain lion. It took around 8hr to download 4.37GB with my home connection. First glance its pretty impressive and it took hardly 25 min to install everything in my retina mac book pro.</p>

<p><img src="//lh5.googleusercontent.com/-xZb_ErT3DjM/UBbGQwpf-tI/AAAAAAAAEHM/MhJ__3-Yhh8/s640/2012-07-30%252018.39.23.jpg" alt="Mountain Lion" /></p>

<!-- more -->


<p>Installation was smooth &amp; fast.</p>

<p><img src="//lh3.googleusercontent.com/-wLopL6XatfQ/UBbGbXtbXGI/AAAAAAAAEHc/ABMG8O1vcnY/s640/2012-07-30%252019.26.45.jpg" alt="OSX Mountain Lion" /></p>

<p><img src="//lh4.googleusercontent.com/-M6bsG8iXg9s/UBbGVS8YOpI/AAAAAAAAEHU/uvuTv5zL7m0/s640/2012-07-30%252019.27.35.jpg" alt="OSX Mountain Lion" /></p>

<p><img src="//lh4.googleusercontent.com/-5dd8iCyM0Y8/UBbGqgxT97I/AAAAAAAAEHk/O-yaApWQ3RY/s640/2012-07-30%252019.28.38.jpg" alt="OSX Mountain Lion" /></p>

<p>After Installation I got an alert like this. Some programs are not compatible with OSX 10.8. Fortunately only program that is not compatible in my software lot was old Transmit FTP client.</p>

<p><img src="//lh4.googleusercontent.com/-63b0OPKukPU/UBbHakUfXEI/AAAAAAAAEIQ/2-eNgseAy0U/s640/2012-07-30%252019.44.02.jpg" alt="OSX Mountain Lion" /></p>

<p>Ater Installation notification center showed one more update</p>

<p><img src="//lh4.googleusercontent.com/-f1w3vhTqE5A/UBbOGYCEmMI/AAAAAAAAEIo/iT3JfrY-nHc/s1024/Updates.jpg" alt="OSX Mountain Lion" /></p>

<p>NetBeans 7.1.x was not working with Mountain Lion. In order to work java applications properly, you have to download latest Java version from Apple. Select java preference using spotlight, new java version will automatically install in your system [java version &ldquo;1.6.0_33&rdquo;].</p>

<p><img src="//lh5.googleusercontent.com/-YzWK7ae83Ag/UBbHbF96-CI/AAAAAAAAEIY/hAPxgqN9WRc/s1024/Screen%2520Shot%25202012-07-30%2520at%252010.44.28%2520PM.png" alt="OSX Mountain Lion" /></p>

<p><img src="//lh5.googleusercontent.com/-U81vzGH4Fd0/UBbHKLvizAI/AAAAAAAAEIA/XDov62GUBTA/s1024/Screen%2520Shot%25202012-07-30%2520at%252010.44.02%2520PM.png" alt="OSX Mountain Lion" /></p>

<p><a href="http://netbeans.org/downloads/">NetBeans version 7.2</a> is available now for download. Which is more compatible with Mountain Lion. In order to install applications from other sources, you have to change a ‘security &amp; privacy’ setting from preference.</p>

<p><img src="//lh3.googleusercontent.com/-Y9ipmleYnY8/UBbRek1SRVI/AAAAAAAAEI4/9tfew_VDjkI/s640/Security%2520%2526%2520Privacy-1.jpg" alt="OSX Mountain Lion" /></p>

<p>Happy coding!!</p>
]]></content>
  </entry>
  
  <entry>
    <title type="html"><![CDATA[Safari 6 Developer Tools Quick Look]]></title>
    <link href="http://praveenvijayan.github.io/blog/2012/07/29/safari-6-developer-tools-quick/"/>
    <updated>2012-07-29T00:52:00+05:30</updated>
    <id>http://praveenvijayan.github.io/blog/2012/07/29/safari-6-developer-tools-quick</id>
    <content type="html"><![CDATA[<p>TOC</p>

<pre>
Introduction
Process
Accessing developer tool
Shortcuts
Anatomy
    Navigation sidebar
        Resources panel
        Storage
        Instrument
        Search
        Issue
        Debug
        Breakpoint
        Log
    Content browser
    Details sidebar
</pre>


<h3>Introduction</h3>

<p>Safari 6 web developer tool has substantial makeover from previous versions. It helps to prototype, debug and optimize web sites and safari extensions.</p>

<h3>Process</h3>

<p>Web development process can be generalized as follows. Developer tool can accelerate this process.</p>

<p><img src="//lh4.googleusercontent.com/-6xgNkaaKKdc/UBSqeeNqZ_I/AAAAAAAAEGk/PQhQIXrG1Xo/s500/prototype.jpg" alt="Web development process" /></p>

<p><strong><em>Prototype</em></strong>
Prototype using HTML, CSS &amp; javascript. Safari Snippet editor can help to create and test code snippets / functional modules. Use web Inspector console to find any errors in the code. User agent switcher will help to quickly check code is working as expected in different browsers and devices. Open site in other browsers and devices directly from safari develop menu.</p>

<!-- more -->


<p><strong><em>Test &amp; debug</em></strong>
Test in different browsers and platforms. Web Inspector shows all the bugs and structural error in the code. Console, issue navigator, Breakpoint navigator, database navigator &amp; log will help to identify error.</p>

<p><strong><em>Optimize</em></strong>
Tune your site for blazing performance by minimizing load time and avoiding performance bottlenecks. Instrument navigator provides tool to analyze and profile site. It shows how much time it take to load a particular resource, site latency due to any server side scripts, missing resources, css selector performance, javascript evaluating and rendering time etc..</p>

<h3>Accessing developer tool</h3>

<p>By default developer tool is not activated. Activate it from preference > advanced tab pane.</p>

<p><img src="//lh3.googleusercontent.com/-wzsTXJ5dRgM/UBPg-SbOiTI/AAAAAAAAEEc/lIXZi6ExWks/s912/Safari%2520web%2520developer%2520-%2520preference%2520-advanced.jpg" alt="Accessing developer tool safari 6" /></p>

<h3>Safari developer tool shortcuts</h3>

<p>Web Inspector : <code>cmd + opt + I [mac] ctrl + alt + I [win]</code></p>

<p>Console : <code>cmd + opt + c [mac] ctrl + alt + c [win]</code></p>

<p>Clear console : <code>cmd + K or ctrl+ L [mac] ctrl + L [win]</code></p>

<p>Debugger</p>

<p>Step Out : <code>F8 or cmd + shift + ;</code></p>

<p>Step Into : <code>F7 or cmd + ;</code></p>

<p>Step over : <code>F6 or cmd + &lsquo;</code></p>

<p>Continue : <code>cmd +/ or cmd+shift+y</code></p>

<h3>Anatomy</h3>

<p>Web developer is divided into 3 main sections.</p>

<p><img src="//lh3.googleusercontent.com/-5TK3-1X2E8I/UBPab_ec_iI/AAAAAAAAEDw/opgGPYlQNSI/s1024/safari%2520developer%2520tool%2520.jpg" alt="Anatomy Developer tools Safari 6" /></p>

<ol>
<li>Navigation sidebar</li>
<li>Content browser</li>
<li>Details sidebar</li>
</ol>


<h4>Navigation sidebar</h4>

<p><img src="//lh4.googleusercontent.com/-trNjLxMyJbo/UBPhJjUWkfI/AAAAAAAAEEk/C5EESCCQ-eU/s512/Safari%2520developer%2520tool%2520-%2520navigation%2520sidebar.jpg" alt="Navigation sidebar" /></p>

<p>This pane hosts main sections of web developer tool. It has a global search to filter resources/items in the currently selected navigator item.</p>

<p>Example : typing “script” will reveal all file names contain script. *.min.js will filter all min javascripts.</p>

<p><strong><em>Resource panel</em></strong>
It shows all the resources used in current site – images, scripts, frames, stylesheets etc.</p>

<p><img src="//lh5.googleusercontent.com/-oACVskskWYk/UBQYpiGO2gI/AAAAAAAAEE0/osNBrT6q15w/s912/Decodize-1.jpg" alt="Resource panel" /></p>

<p><strong><em>Storage</em></strong>
Storage helps with debugging client side storage. You can inspect local key-value storage, offline application cache, web database and cookies. Now you can edit and delete local storage data. Indexed DB is missing. It is possible to execute SQL command against displayed database. One problem I noticed is the missing clear command.</p>

<p><img src="//lh6.googleusercontent.com/-BHRhIu_QgJo/UBQZKH7ZtjI/AAAAAAAAEE8/Y1XPCDfmklE/s720/A%2520Simple%2520TODO%2520list%2520using%2520HTML5%2520WebDatabases%2520-%2520HTML5%2520Rocks-4.jpg" alt="Storage" /></p>

<p><strong><em>Instrument</em></strong>
Optimizing web site is a tedious job. You have to know which script is blocking the site, which resource is taking more bandwidth etc.. Instrument provides tool to mitigate optimization issues. Instruments gives us a total view of network requests, css layout calculations and rendering and javascript events involved.</p>

<p><img src="//lh4.googleusercontent.com/-1fGRX7zWxsU/UBQZa4B0y3I/AAAAAAAAEFU/koP0TwR8wgQ/s1024/Decodize-3.jpg" alt="Instrument" /></p>

<ol type="a">
<li>Network Request Timeline</li>
<li>CSS Layout calculations</li>
<li>Javascript &amp; Events</li>
</ol>


<p>When network is selected content browser will show all the detailed list of resources that took the bandwidth &amp; time to took to load. Hovering each item in content browser will bring a small icon that leads to the exact resource. Ex: image, js etc..</p>

<p>Click on the circle to profile your javascript or CSS to know what causes the site performance issue.</p>

<p><strong><em>Search</em></strong>
Search panel helps to search file contents.</p>

<p><img src="//lh5.googleusercontent.com/-kxiED1xyAIA/UBQZR2z9lZI/AAAAAAAAEFE/V0mKGvZs9mo/s1024/A%2520Simple%2520TODO%2520list%2520using%2520HTML5%2520WebDatabases%2520-%2520HTML5%2520Rocks-2.jpg" alt="Search" /></p>

<p><strong><em>Issue</em></strong>
Issues will list all the site structural and script issues. It shows all the errors encounter during the site load.</p>

<p><img src="//lh4.googleusercontent.com/-IsMGqm41jI0/UBQZoud1h6I/AAAAAAAAEF0/C0rU2DByraE/s1024/Decodize.jpg" alt="Issue" /></p>

<p><strong><em>Debug</em></strong>
Script execution can be paused and examined in debug navigator.</p>

<p><img src="//lh4.googleusercontent.com/-zKJ-aNTaKNE/UBQZY3vYkOI/AAAAAAAAEFM/2K8eg9QZCWc/s1024/Decodize-3%25202.jpg" alt="Debug" /></p>

<p><strong><em>Breakpoint</em></strong>
From resource navigator you can set breakpoints and can view the variables and call stacks.</p>

<p><img src="//lh4.googleusercontent.com/-OhSGSGTEkIY/UBQZcPLLexI/AAAAAAAAEFc/l304UKHo0sY/s1024/Decodize-4%25202.jpg" alt="Breakpoint" /></p>

<p><strong><em>Log</em></strong>
It is the real console. There is a quick console and a log navigator. You can execute all console commands &amp; scripts here.</p>

<p><img src="//lh3.googleusercontent.com/-CvI4NrbA-9I/UBQfbeWljsI/AAAAAAAAEGE/KjDkmXACVIQ/s1024/Decodize%25202.jpg" alt="Log" /></p>

<h4>Content browser</h4>

<p><img src="//lh5.googleusercontent.com/-8-KOh4BU_J0/UBQgsg2a2uI/AAAAAAAAEGM/ZtOHmAERg2E/s640/Decodize-8.jpg" alt="Contant browser Safari developer tool" /></p>

<p>Content browser will show contents based on the selection made on the Navigator sidebar. You can access DOM of the current site from the content browser.</p>

<h4>Details sidebar</h4>

<p><img src="//lh4.googleusercontent.com/-OoJp9VshiPw/UBQhXHCP_eI/AAAAAAAAEGU/RKyr5i7zxxY/s1024/Decodize-1%25202.jpg" alt="Details sidebar" /></p>

<p>Based on the content browser selection this panel reveals the resource type, CSS properties, javascript events etc.. here.</p>

<h3>Reference</h3>

<p><a href="http://developer.apple.com/library/safari/#documentation/appleapplications/Conceptual/Safari_Developer_Guide/1Introduction/Introduction.html">Apple developer tool</a></p>
]]></content>
  </entry>
  
  <entry>
    <title type="html"><![CDATA[Codebase : Sexy Way to Manage Code Snippets.]]></title>
    <link href="http://praveenvijayan.github.io/blog/2012/06/06/codebase-sexy-way-to-manage-code-snippets/"/>
    <updated>2012-06-06T00:43:00+05:30</updated>
    <id>http://praveenvijayan.github.io/blog/2012/06/06/codebase-sexy-way-to-manage-code-snippets</id>
    <content type="html"><![CDATA[<h3>What is Codebase?</h3>

<p><a href="http://codebase.decodize.com/">Codebase</a> is a code snippet management tool. It has 2 parts – 1. Server side code 2. Dreamweaver extension.</p>

<p><img src="//a248.e.akamai.net/camo.github.com/b1d9fbc4770982d775755d86658c80a09e2d289c/687474703a2f2f6465636f64697a652e636f6d2f64656d6f732f636f6465626173652f636f6465626173652e6a7067" title="Codebase" alt="Codebase" /></p>

<p>Following like demonstrates how Codebase will function.</p>

<p><a href="http://codebase.decodize.com/">View codebase</a></p>

<!-- more -->


<h3>How can I use it?</h3>

<iframe width="640" height="480" src="http://www.youtube.com/embed/smJaNqtsONA" frameborder="0" allowfullscreen></iframe>


<ol>
<li>Host Codebase</li>
<li>Add snippets – Eg:”header”</li>
<li>Install Dreamweaver extension</li>
<li>Add server path to Codebase settings form DW commands menu [Commands > codebase > codebase settings] eg: <a href="http://codebase.decodize.com/getResult.php">http://codebase.decodize.com/getResult.php</a></li>
<li>Type h:header- to insert HTML of a snippet named “header”.</li>
</ol>


<p><img src="//a248.e.akamai.net/camo.github.com/b182944b4af56d18570b5bea440778f59efcf07a/687474703a2f2f6465636f64697a652e636f6d2f64656d6f732f636f6465626173652f64772d6578742e6a7067" alt="Dreamweaver extension" /></p>

<p><img src="//a248.e.akamai.net/camo.github.com/10ab8cc08778d0256b151efdc46f483234fc278d/687474703a2f2f6465636f64697a652e636f6d2f64656d6f732f636f6465626173652f64772d636f6465626173652e6a7067" alt="Dreamweaver extension" /></p>

<p><img src="//a248.e.akamai.net/camo.github.com/9e6a54230b3323c947a0548f1c1cfe996cc8f2eb/687474703a2f2f6465636f64697a652e636f6d2f64656d6f732f636f6465626173652f64772d636f646562617365322e6a7067" alt="Dreamweaver extension" /></p>

<h3>Where I can download the code?</h3>

<p>Both server and Dreamweaver extension is opensource and can be downloaded from github.</p>

<p><a href="https://github.com/praveenvijayan/codebase">View on Github</a></p>
]]></content>
  </entry>
  
  <entry>
    <title type="html"><![CDATA[How to Build a Nodejs Npm Package From Scratch.]]></title>
    <link href="http://praveenvijayan.github.io/blog/2012/05/07/build-nodejs-npm-installation-package-scratch/"/>
    <updated>2012-05-07T00:25:00+05:30</updated>
    <id>http://praveenvijayan.github.io/blog/2012/05/07/build-nodejs-npm-installation-package-scratch</id>
    <content type="html"><![CDATA[<p>Aim is to create a node package and publish it in npm registery. This is a simple example code with which you can understand all the process involved to create, install and publish node packages.</p>

<h3>What is nodejs?</h3>

<p>Hmm.. you will get plenty of good resources when you google it with this keyword. Start by installing it from here : <a href="http://node.org/">nodejs</a></p>

<h3>What is npm?</h3>

<p><a href="http://npmjs.org/">Node package manager</a> and it is used to add or remove node applications. It came as a default package in newer node installations, both windows and mac. Install it on other platforms by refering this <a href="https://github.com/isaacs/npm">resource</a>. Check out all the <a href="http://search.npmjs.org/">npm registry entries here</a>.</p>

<p>Install your fevorite application –
    npm install app-name.
Example:-
    npm install jsbeautify</p>

<!-- more -->


<h3>First node program</h3>

<p><strong><em>Prerequisite</em></strong></p>

<p><em>Install nodejs
</em>Github account [Optional]</p>

<p><strong><em>Objective</em></strong></p>

<p>Create a nodejs application that reads a file and replace all the matching text in it with the one that you pass as an argument.</p>

<p>Eg:- readme.txt content – “Drink like a dog”</p>

<pre><code>replaceme readme.txt dog cat
</code></pre>

<p>//out.txt – Drink like a cat</p>

<h3>Agenda</h3>

<p><a href="#base">Setting up base – folder structure</a>
<a href="#modules">Creating node modules and require it in other modules</a>
<a href="#readwirte">Read &amp; write file using node</a>
<a href="#args">Passing arguments from CLI</a>
<a href="#json">Creating package.json</a>
<a href="#package">Packaging application</a>
<a href="#npm">Adding users to npm registry</a>
<a href="#publish">Publishing application</a>
<a href="#uninstall">Uninstallling application from system</a>
<a href="#unpublish">Unpublishing application from npm registry</a></p>

<h3>Setting up base – folder structure</h3>

<p>Application’s folder structure as follows.</p>

<pre><code>replaceme
   - bin
   --- replaceme.js
   - lib
   --- main.js
   --- replace.js
   package.json
   README.md
</code></pre>

<p>Open cmd and type <code>mkdir replaceme &amp;&amp; cd replaceme &amp;&amp; mkdir bin &amp;&amp; mkdir lib</code>. Create replacement.js, main.js and replace.js inside respective folders.</p>

<p><strong><em>Create replace function</em></strong></p>

<pre><code>var text = "To live long, eat like a cat, drink like a dog.";
var out = text.replace('cat','dog');
console.log(out);
</code></pre>

<p>Run it with</p>

<pre><code>c:\&gt;replaceme\lib\&gt; &lt;code&gt;node replace.js&lt;/code&gt;
//Output – To live long, eat like a dog, drink like a dog.
</code></pre>

<p><strong><em>Node modules</em></strong></p>

<p>Next step is to convert above code into a node module so that we can require it in other js/modules. Incuding an external javascript in our document is simple – require(‘modulejs’);.</p>

<pre><code>//replaceme.js
exports.replaceme = function(text, vala, valb){
    function out(val){
        return text.replace(vala,valb);
    }
    return out(vala,valb);
}
</code></pre>

<p>exports.functionName – Its the simplest way to create a module &amp; now replaceme is a module. We can import it in main.js as require(‘./replaceme’);</p>

<p>More informations on creating modules – <a href="http://book.mixu.net/ch8.html">check this link</a></p>

<pre><code>c:\&gt;replaceme\lib\&gt; node
&gt; re = require('./replaceme')
&gt; re.replaceme("The text to replace","replace","add")
&gt; The text to add
</code></pre>

<p>Our module is functioning now. Now create main.js.</p>

<pre><code>//main.js

(function() {
    //Declaring variables  
    var fs, reptxt, filedata;

    //Requiring files
    fs = require('fs');
    reptxt = require ('./replaceme');

    //Reading file test.txt
    fs.readFile("../test.txt",'utf8',function(err,data){
      if(err) {
        console.error("Could not open file: %s", err);
        process.exit(1);
     }
     //Calling replacement function
     console.log(reptxt.replaceme(data,"npm","123"));
    });

}).call(this)
</code></pre>

<p>Main.js reads file content and passes the content to replaceme function. It will output replaced string.</p>

<p><strong><em>Read file using node file module</em></strong></p>

<p>Now we have to write its out put into a file and save it in the same dir. It is also possible to overwrite the same file.</p>

<pre><code>//main.js

(function() {
    //Declaring variables  
    var fs, reptxt, filedata;

    //Requiring files
    fs = require('fs');
    reptxt = require ('./replaceme');

    //Reading files
    fs.readFile("../test.txt",'utf8',function(err,data){
      if(err) {
        console.error("Could not open file: %s", err);
        process.exit(1);
     }
     //Calling replacement function
     filedata = reptxt.replaceme(data,"npm","123");

     //Writing replaced text into a new file
    fs.writeFile("../out.txt", filedata, function(err){
            if(err) {
                console.error("Error saving file %s", err);
                process.exit(1);
            }
            console.log('out.txt file saved!');
        });

    });

}).call(this)
</code></pre>

<p>Now when we run node command <code>node main.js</code> you will see a new file named ‘out.txt’.</p>

<p><strong><em>Passing arguments</em></strong></p>

<p>We neeed to pass our filename as an argument. ‘process.argv’ used to catch arguments that passes through CLI. It gives us an array containing commandline arguments. We have to process this array &amp; get the required values.</p>

<p>Here in our example we are passing 3 arguments ‘the file, keyword, replace word’ –</p>

<pre><code>node main.js text.txt cat dog
</code></pre>

<p>This is the native way to parse commandline arguments. There are other libraries available for easy parsing of arguments [optimist, commander etc&hellip; ].</p>

<pre><code>// print process.argv - node main.js ../text.txt cat dog
process.argv.forEach(function (val, index, array) {
  console.log(index + ': ' + val);
});

//Output
0: node
1: path/main.js
2: ../text.txt
3: cat
4: dog
</code></pre>

<p>We need 2,3 &amp; 4 values. Note: its not a best practice to parsing parameter like this. Its better to use any <a href="https://github.com/joyent/node/wiki/modules#wiki-parsers-commandline">node libraries</a>.</p>

<pre><code>(function() {
    //Declaring variables  
    var fs, reptxt, filedata;

    //Requiring files
    fs = require('fs');
    reptxt = require ('./replaceme');

    //Reading files
    fs.readFile(process.argv[2],'utf8',function(err,data){
      if(err) {
        console.error("Could not open file: %s", err);
        process.exit(1);
     }
     //Calling replacement function
     filedata = reptxt.replaceme(data,process.argv[3],process.argv[4]);

     //Writing replaced text into a new file
    fs.writeFile("../out.txt", filedata, function(err){
            if(err) {
                console.error("Error saving file", err);
                process.exit(1);
            }
            console.log('out.txt file saved!');
        });

    });

}).call(this)
</code></pre>

<p>Now we got 3 arguments ‘../text.txt, cat, dog’. node main.js ../text.txt cat dog this node command will read text.txt and replace all the “cat” text with “dog” and output the result in ‘out.txt’.</p>

<p><strong><em>Bin folder – replaceme file</em></strong></p>

<p>This file is the entry point. We point to this file from package.json.</p>

<pre><code>#!/usr/bin/env node
var path = require('path');
var fs = require('fs');
var lib = path.join(path.dirname(fs.realpathSync(__filename)), '../lib');
require(lib + '/main.js');
</code></pre>

<h3>Preparing to publish</h3>

<p><strong><em>Creating package.json</em></strong></p>

<p>This text file contains all the information about the project, like project path, dependencies, author name, tags, bug tracking info etc.. To create a package.json run npm init command from the root folder. It will ask series of questions and finally it will create package.json file.</p>

<p>Our package.json file will look like this.</p>

<pre><code>{
  "author": "praveen vijayan ",
  "name": "replaceme",
  "description": "Node commandline application to replace selected text in a file.",
  "version": "0.1.1",
  "repository": {
    "url": ""
  },
  "main": "./lib/main",
  "bin": {
    "replaceme": "./bin/replaceme"
  },
  "dependencies": {},
  "devDependencies": {},
  "optionalDependencies": {},
  "engines": {
    "node": "*"
  }
}
</code></pre>

<p><strong><em>Add new user to npm registry</em></strong></p>

<pre><code>npm adduser 
</code></pre>

<p>Provide username &amp; email address. This command will register a new user into npm registry.</p>

<p><strong><em>Finally publish to npm registry</em></strong></p>

<pre><code>npm publish 
</code></pre>

<p>and test by installing it</p>

<pre><code>npm install -g replaceme
</code></pre>

<p><strong><em>Uninstall node package</em></strong></p>

<pre><code>npm uninstall -g replaceme
</code></pre>

<p><strong><em>Unpublish from npm registry</em></strong></p>

<pre><code>npm unpublish replaceme@0.1.1
</code></pre>

<h3>Upload files into github</h3>

<p>It is not a compelsory part but it is a best practice to update your files to github and add links in package.json. Open README.md file created earlier and add basic info about your project using markdown syntax. Commit all files into git and activate issue tracker from account.</p>

<h3>Download files</h3>

<p><a href="http://www.decodize.com/demos/nodejs/replaceme.zip">Download files</a></p>

<p><a href="http://search.npmjs.org/#/replaceme">npm registry link</a></p>

<p>happy nodding :)</p>
]]></content>
  </entry>
  
  <entry>
    <title type="html"><![CDATA[Weight Scale Using HTML5 Drag &amp; Drop and CSS3 Rotation]]></title>
    <link href="http://praveenvijayan.github.io/blog/2012/04/02/weight-scale-using-html5-drag-and-drop-and-css3-rotation/"/>
    <updated>2012-04-02T00:14:00+05:30</updated>
    <id>http://praveenvijayan.github.io/blog/2012/04/02/weight-scale-using-html5-drag-and-drop-and-css3-rotation</id>
    <content type="html"><![CDATA[<p><img src="//lh5.googleusercontent.com/-sWfGV-4_nWw/UNn15N7DaWI/AAAAAAAAFCY/FZtIQfW70ok/s628/html5-drag-and-drop-css3-rotation-weight-scale.jpg" title="Weight scale using HTML5 drag &amp; drop and CSS3 rotation" alt="Weight scale using HTML5 drag &amp; drop and CSS3 rotation" /></p>

<p>Lets start with a demo (only works in chrome).</p>

<p><a href="http://www.decodize.com/demos/Weight%20scale%20using%20HTML5%20drag%20&amp;%20drop%20CSS3%20rotation/weight.html">Weight scale</a></p>

<p><strong><em>Usage</em></strong></p>

<p>Drag and drop weight block into scale [over doted outline]. Double click to remove a weight. Demo uses jQuery for DOM manipulation, css3 rotation for needle movement.</p>

<p><strong><em>HTML5 Drag and drop basics</em></strong></p>

<p>Before implementing <a href="http://html5please.com/#drag">check the readiness of drag and drop</a> Currently it better to use jQuery UI or other JavaScript libraries to do a better cross browser handling.</p>

<!-- more -->


<p>HTML5 Drag and drop based on the Microsoft IE’s original implementation (IE5 and up). Image and links are dragabble by default in browsers. Proof? try drag and drop them in the address bar, you will be taken to the specified image/link. Set draggable=”true” in order to make other elements draggable.</p>

<p>HTML5 Drag and drop based on the Microsoft IE’s original implementation (IE5 and up). Image and links are dragabble by default in browsers. Proof? try drag and drop them in the address bar, you will be taken to the specified image/link. Set draggable=”true” in order to make other elements draggable.</p>

<pre><code>&lt;div draggable="true"&gt;Im a draggable content&lt;/div&gt;
</code></pre>

<p>Okay, now about drop zone. There is no droppable=”true”!!. We have to handle it via javascript events. Following are the events related to DnD.</p>

<ul>
<li>dragstart</li>
<li>drag</li>
<li>dragenter</li>
<li>dragleave</li>
<li>dragover</li>
<li>drop</li>
<li><p>dragend</p>

<p>  <div draggable="true" id="drag">Im a draggable content</div>
  <div id="dropzone">Drop area</div>
  <script>
  var elem = document.getElementById(&lsquo;drag&rsquo;);
      elem.addEventListener(&lsquo;dragstart&rsquo;, function(e){
        //Do whatever on when user start dragging.</p>

<pre><code>  }, false)
</code></pre>

<p>  </script></p></li>
</ul>


<p>Next step is to drop our dragged payload. We need 2 events (dragover and dragenter) in order to make an element drop capable.</p>

<pre><code>&lt;div draggable="true" id="drag"&gt;Im a draggable content&lt;/div&gt;
&lt;div id="dropzone"&gt;Drop area&lt;/div&gt;
&lt;script&gt;
var elem = document.getElementById('drag'),
    dropZone = document.getElementById('dropzone');
    elem.addEventListener('dragstart', function(e){
      //Do whatever on when user start dragging.
    }, false);

elem.addEventListener('dragenter', function(e){
      //Things like visual cued for the drop zone can be added here.
    }, false);

elem.addEventListener('dragover', function(e){
     //Things like visual cued for the drop zone can be added here.
  }, false);

&lt;/script&gt;
</code></pre>

<p>Now we have to do the actual drop. ‘dataTransfer’ holds the draged object. dataTransfer.getData(‘text/html’) will get you the actual dragged element.</p>

<pre><code>var dropZone = document.getElementById('dropzone');
 elem.addEventListener('drop', function(e){
      e.preventDefault();
      dropZone.innerHTML = e.dataTransfer.getData('text/html');      
    }, false)
</code></pre>

<p><strong><em>Summary</em></strong></p>

<p>DnD spec is not completed &amp; it is also painful to develop a cross browser DnD solution with pure API now.</p>

<p><strong><em>Resources</em></strong></p>

<p><a href="http://www.html5rocks.com/en/tutorials/dnd/basics/">Native HTML5 Drag and Drop – HTML5 Rocks</a>
<a href="http://playground.html5rocks.com/#drag_and_drop">Drag and drop html play ground</a>
<a href="https://developer.mozilla.org/En/DragDrop/Drag_and_Drop">Drag and Drop Mozilla MDN</a>
<a href="http://www.useragentman.com/blog/2010/01/10/cross-browser-html5-drag-and-drop/">Article on useragentman.com</a></p>
]]></content>
  </entry>
  
  <entry>
    <title type="html"><![CDATA[StyleDocco – Create Generated Style Guide and Documentation for Your Web Project]]></title>
    <link href="http://praveenvijayan.github.io/blog/2012/03/14/styledocco-create-generated-style-guide-and-documentation-for-your-web-project/"/>
    <updated>2012-03-14T23:35:00+05:30</updated>
    <id>http://praveenvijayan.github.io/blog/2012/03/14/styledocco-create-generated-style-guide-and-documentation-for-your-web-project</id>
    <content type="html"><![CDATA[<p><a href="http://jacobrask.github.com/styledocco/" title="StyleDocco">StyleDocco</a> is a style guide and documentation generator. It parse CSS comments in your stylesheet and creates style guide based on the comments. Its a nodejs package and can install using npm install.</p>

<p>Example style document generated using styledocco – <a href="http://jacobrask.github.com/styledocco/examples/bootstrap/docs/index.html">twitter bootstrap</a></p>

<h3>Nodejs</h3>

<p>It is JavaScript running on server using google’s V8 JavaScript engine. Download latest node installer (win/mac/source code) form <a href="http://nodejs.org/" title="Nodejs">nodejs.org</a> &amp; install it.</p>

<p><img src="//lh4.googleusercontent.com/-qUi8aCGOZXE/UNnx0Jg6TRI/AAAAAAAAFA8/UaRKsCLNYDM/s576/nodejs.jpg" title="Nodejs" alt="Nodejs" /></p>

<p>After installation open command prompt and type “node -v”. You will get the node version number.</p>

<!-- more -->


<p><img src="//lh6.googleusercontent.com/-hKDLrHMsOx8/UNnx0UWXjcI/AAAAAAAAFBA/6PzH0mwVQvA/s597/node-version.jpg" alt="Node version" /></p>

<p>After nodejs installation, install StyleDocco via npm (Node package manager). In windows open command prompt/mac terminal  &amp; type.</p>

<pre><code>npm install -g styledocco
</code></pre>

<p>In mac you have to type</p>

<pre><code>sudo npm install -g styledocco
</code></pre>

<p><img src="//lh5.googleusercontent.com/-G6OPFhwUR2Y/UNnycaUmXXI/AAAAAAAAFBY/GBG-MXQEc2A/s597/styledocco-install.jpg" title="npm install -g styledocco" alt="npm install -g styledocco" /></p>

<p>It will install in few minute depending upon your connection speed.</p>

<h3>Preparing stylesheet for documentation</h3>

<p>Styledocco uses <a href="//github.com/chjj/marked">marked</a> to parse &amp; generate HTML. First we will check a simple stylesheet (example from <a href="//github.com/jacobrask/styledocco/blob/master/README.md">author</a>).</p>

<pre><code>/* Provides extra visual weight and identifies the primary action in a set of buttons &lt;br/&gt; ``` &amp;lt;button&amp;gt;Primary&amp;lt;/button&amp;gt; ``` */ &lt;br/&gt;.btn.primary { background: blue; color: white; }
</code></pre>

<p><img src="//lh4.googleusercontent.com/-9Rv1HOSqzr4/UNnxzzBrlhI/AAAAAAAAFA4/0weqZ_dvDFo/s597/readme-style-content.jpg" title="Styledocco" alt="Styledocco" /></p>

<p>Save the css on your site folder.  Now need a readme.md file. Create a text file and rename it to readme.md as save it on the same folder. In read me file you can use markdown to show the details about the style sheet. This readme will be the landing page of your style guide. Readme.md is required otherwise styledocco will throw an error.</p>

<p><img src="//lh6.googleusercontent.com/-jpRyqwdtiUI/UNnx1JaszXI/AAAAAAAAFBE/l7_jgaRz3PM/s597/readme-style.jpg" title="Style guide" alt="Style guide" /></p>

<h3>Style guide creation</h3>

<p><strong><em>Syntax</em></strong></p>

<pre><code>styledocco [options] [INPUT]
</code></pre>

<p><strong><em>Options</em></strong></p>

<p>–name, -n Name of the project (required)
–out, -o Output directory (default: “docs”)
–tmpl Directory for custom docs.jade template (optional)
–overwrite Overwrite existing files (docs.css) in target directory.</p>

<p><strong><em>Usage</em></strong></p>

<p>Open command prompt and type.</p>

<pre><code>styledocco -n styleguide style.css
</code></pre>

<p><img src="//lh4.googleusercontent.com/-WlKoGiVGuYw/UNnzMWkRTHI/AAAAAAAAFBo/wrtdBo9Szv0/s597/styledocco-create.jpg" alt="styledocco -n styleguide style.css" /></p>

<p>Styledocco will parse all comment in the document &amp; create style guide based on the comments provided in your css file. Styledocco uses <a href="http://daringfireball.net/projects/markdown/syntax">markdown syntax</a>.</p>

<p><img src="//lh4.googleusercontent.com/-cBE0-erg3As/UNnzLZYR1rI/AAAAAAAAFBg/bOfvY2Bbymc/s597/styledocco-output.jpg" alt="Styledocco" /></p>

<p>Your style document will create inside docs folder. If you want a different directory to store output files use -o in your styledocco create command (<code>styledocco -n styleguide -o c:\styleguide style.css </code>). Open index.html form docs folder and you can see a botton and its style description.</p>

<p>Styledocco is also capable of parsing LESS, SASS &amp; SCSS files and can generate style documents. Twitter <a href="http://jacobrask.github.com/styledocco/examples/bootstrap/docs/less/buttons.html">bootstrap style guide</a> is an example.</p>

<p>Use markdown syntax in your readme.md &amp; stylesheet files. First &amp; second level of heading will automatically split into sections. If you want to exclude a comment, that you wish not being parsed by Styledocco, add a few space in front of the comment.</p>

<p>Example -</p>

<pre><code>/*This comment will parse by Styledocco*/
     /*No this is an internal style comment*/
</code></pre>

<p>Large web projects we can use style guide for future reference and  optimization.</p>
]]></content>
  </entry>
  
  <entry>
    <title type="html"><![CDATA[Adding Roboto Font in Windows Desktop]]></title>
    <link href="http://praveenvijayan.github.io/blog/2012/03/12/adding-roboto-font-in-windows-desktop/"/>
    <updated>2012-03-12T22:35:00+05:30</updated>
    <id>http://praveenvijayan.github.io/blog/2012/03/12/adding-roboto-font-in-windows-desktop</id>
    <content type="html"><![CDATA[<p><img src="//lh4.googleusercontent.com/-bpwEONwjg0U/UNneJ8jfmvI/AAAAAAAAE_M/2kOzXagRlM0/s512/roboto-font.jpg" title="Installing Roboto Font" alt="Roboto font" /></p>

<p>in this post I’ll show you how to replace system fonts in windows with Roboto. Roboto is crafted for requirements of UI &amp; high-resolution screens.</p>

<p><img src="//lh3.googleusercontent.com/-zNVgTJktFEg/UNneMBnZJlI/AAAAAAAAE_s/i1XrBRw1V8c/s416/roboto.jpg" title="Roboto font" alt="Roboto Font" /></p>

<!-- more -->


<h3>Steps</h3>

<ol>
<li><p>Download the font from google android design center <a href="//developer.android.com/design/style/typography.html#actionbar">Robot font</a>.</p></li>
<li><p>Install the font</p></li>
</ol>


<p><img src="//lh3.googleusercontent.com/-JonsWStTtOs/UNneKImta4I/AAAAAAAAE_Q/Pr2F7t_tKh0/s724/roboto-font-install.jpg" alt="Roboto font" /></p>

<ol>
<li>Right click desktop &amp; select personalize</li>
</ol>


<p><img src="//lh3.googleusercontent.com/-nLkkhUixUhw/UNnfqmzvTZI/AAAAAAAAFAc/zOcJLixDbOU/s416/roboto-personalize.jpg" title="Windows right click personalize" alt="Windows right click personalize" /></p>

<ol>
<li>Select window color</li>
</ol>


<p><img src="//lh6.googleusercontent.com/-iWpfdBu5Jbo/UNneLB2UqOI/AAAAAAAAE_Y/7xc-LcFBCkE/s640/roboto-personalize-windowColor.jpg" title="Window color" alt="Window color" /></p>

<ol>
<li>Select advanced appearance settings</li>
</ol>


<p><img src="//lh3.googleusercontent.com/-9icL7TPXaZA/UNneL8w2bGI/AAAAAAAAE_g/Hw0k_-m2o8Q/s640/roboto-window-color-appearancejpg.jpg" title="Advanced settings" alt="Advanced settings" /></p>

<ol>
<li>Select Item drop down &amp; Change font to Roboto for the following.</li>
</ol>


<p><img src="//lh5.googleusercontent.com/-LcI_nuFselo/UNneKrLd-NI/AAAAAAAAE_U/rbFYufcihdI/s505/roboto-color-appearance.jpg" title="Select Item drop down" alt="Select Item drop down" /></p>

<ol>
<li>To change windows system font – type regedit on windows run. Goto HKEY_LOCAL_MACHINE > Software > Microsoft > Windows NT > CurrentVersion > FontSubstitutes</li>
</ol>


<p><img src="//lh3.googleusercontent.com/-XP6bCEbSSX4/UNneMBA951I/AAAAAAAAE_w/WyHB4nR7ifU/s720/roboto-regedit.jpg" title="Windows registry FontSubstitutes" alt="Windows registry FontSubstitutes" /></p>

<ol>
<li>Restart</li>
</ol>

]]></content>
  </entry>
  
</feed>